See the most current update...
Hey Guys and Gals, I have been busily nerding out on a new web sharpening action for landscape imagery. (Not to say you couldn't use it on cat pictures, just that it is untested- and there is a small chance it would rip a hole in the spacetime continuum....)
What do you need to use this action? A semi-modern version of photoshop and a reckless sense of adventure should do.
So what is it, and why is it better than what you are using now?
First off, I didn't say it was better! It's just different. It is free, and the more tools in your toolbox- always a good thing, right? Long story short, I am very into editing, but not the repetitive, boring stuff like dust spot removal. With all the sharpeners i found online, getting rid of pesky halos around ridge lines, tree branches, etc is both necessary and very dull work. I wanted a "fire and forget" type sharpener, that could handle whatever I threw at it and still come back with natural results.
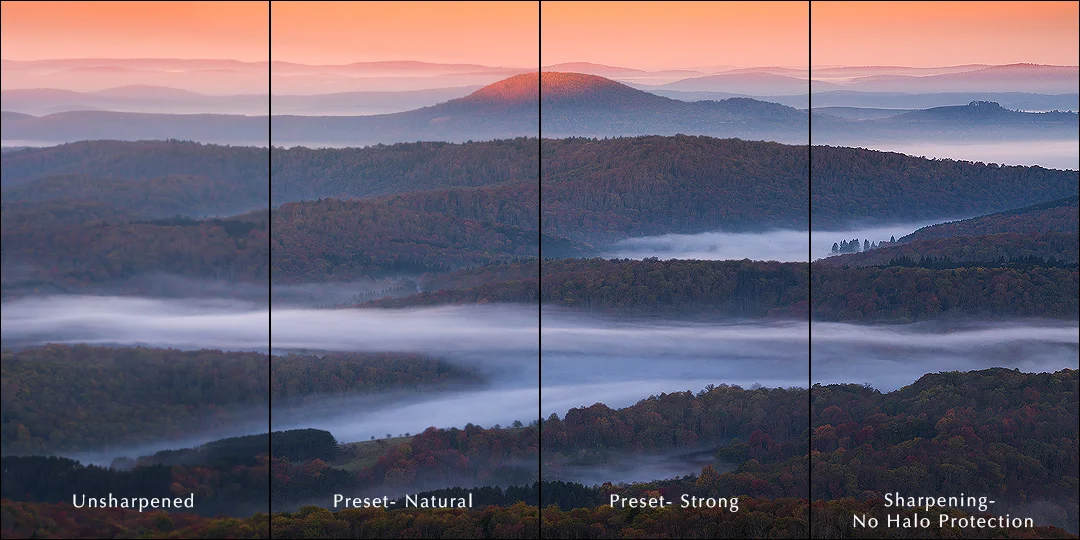
Comparison of different modes at 100%. On the right, notice the prominent halos around every ridge. Next block to the left, halos are almost eliminated, but the image is still very sharp. Left of that, the haloing is gone, and the image is much sharper than the unsharpened image. Here is the image file if you want to view 100% on your own device, the web resizes these things sometimes.

Above is the halo mask that was generated. You can see it identified the ridge lines quite well. It works in concert with the luminosity mask and the spectrals mask.
In a very general overview, this action sharpens your image, and then hunts down and zaps any areas where haloing or over sharpening occur. If you thirst for more technical details, keep reading- if that's enough for you skip to the next section. Specifically, first it sharpens your image based on the popular method that I believe was invented by Alex Nail, and is also used in the popular TK actions. It involves resizing your image in different steps and sharpening at each point. It also resizes a completely unsharpened version of your source. Next, it runs analysis to determine areas with strong micro contrast. Then, it generates a mask to reduce or eliminate the sharpening in those areas. It outputs the result of the masked sharpened layer combined with the unsharp layer, then it runs the whole analysis/output process two more times to make sure all those pesky halos are zapped. The final, 3x analyzed mask is applied to the fully sharp layer. Next, the image is analyzed again on a broad scale to determine areas of overall lightness and darkness, and a sharpened layer free from the halo masking effect is allowed to bleed into the original image at 50%, to allow spectral highlights to appear in the darker areas of the image. (think water glinting on dark rocks in the foreground, stuff like that) Finally, a shadows luminosity mask is created, and applied to both of the previous layers, which are now in a group. Phew!
It has 3 output resolutions- 1080 (instagram), 2048 (Facebook) and finally Retina, for high DPI displays. If you like it and you find it lacking in a certain resolution, message me and I'll see if I can add it for you. It also has 4 flavors- Strong, Mid, Light, and Natural. Natural uses full strength luminosity masking and no spectral highlights added for the most halo-free viewing experience. Strong has NO luminosity masking and full strength spectrals, for the most apparent sharpness. The other two fall in-between the Strong and Natural settings. Enjoy, and feel free to let me know what you think!
Thanks,
Zach
UPDATE 02-25-18
Sharpening actions updated to 2.4, thanks to Kane Engelbert for the great suggestions! If you haven't done so, do yourself a favor and check out Kane's work.
- Simplified the options, now there is only Strong and Natural presets. Strong uses halo masking, natural uses halo masking plus 50% lumo masking to keep the sharpening out of the highlights. The default is a bit strong, the intent is for the user to adjust opacity to taste.
- Many new size options including 900, 1000, 1200, 1400, 1600, 1800, 2000, and one for the new instagram vertical size 1080w x 1350h
- Spectrals layer works well on traditional landscapes but results erratic on abstracts and such, therefore the default is now off and can be turned on at users discretion to add unmasked sharpening into darker areas.
- Should be a bit faster on large files IE d850, etc
- Default strength now 50% for Natural, 100% for Strong