How Alfred Hitchcock can help you compose

Hello world, today I’d like to talk about traditional landscape photography composition. When you are shooting a non-abstract scene, you most likely have a fore, mid, and background. Arranging them in a pleasing manner is one of the most fun (and sometimes challenging) aspects of landscape photography. Let me cover an approach you may not have seen before- the dolly zoom.

The dolly zoom is an effect you have seen in countless films. It was first used in Alfred Hitchcock’s Vertigo way back in 1958. It is the moment in a movie when a character realizes there is a vast conspiracy against them, and the whole world grows around them while they stay the same size. The effect is created by placing the camera on a movable dolly, and the camera is moved towards the subject. The cameraman simultaneously zooms out at a rate that keeps the subject the same size, but because of the change in focal length, everything else changes size in relation to them.

Understanding and implementing this effect in your still imagery can have an immense impact on your composition. So how do you do it? And why would you do it?

Consider that there are only two things you can do to change your composition. The first is moving your camera. The second is changing your focal length. The dolly zoom comes into play when you change both your position and your focal length, while attempting to capture the same elements. Below is an example of a waterfall shot 7 times from 14 to 78mm, with similar composition- waterfalls below a gorge filled with autumn leaves. To capture this series, I simply backed up, zoomed in, and recomposed for each shot. In essence I did a dolly zoom on the waterfall. (Although this example is a waterfall, the technique certainly works just as well with mountains, desert spires, etc.)

Take a minute to see how the effect changes the feel of the image. At 14-24mm the waterfall certainly dominates, but the neat gorge and leaves take a distant back seat. At 32-40mm, everything is feeling nice and balanced. By 62mm the falls are looking pretty diminutive and the overall flow of the image feels claustrophobic. It’s all a matter of personal opinion but I prefer around the 32-40mm range, not something that would be apparent from just showing up and shooting this waterfall! You may also notice that this is not exactly a strict dolly zoom, because I let the waterfall size change. That’s because I am more interested in the interaction of the foliage filled gorge and the waterfall than keeping things the same size.

Understanding and implementing this effect in your own imagery will add a new dimension to your skillset. When you find a fore and background, you can choose the size relationship between them. Next time you are out, try a couple of different focal lengths of the same composition using the dolly zoom effect. Set the size of your background with your focal length, and the size of your foreground with your feet! (by moving) You will likely find you have a much easier time creating balanced compositions, I know I do!

I’ll leave you with a GIF of the sequence above, cause GIFS are cool.

And finally, I am getting together a mailing list, for any who are interested!

Z

FallsSmall.gif

Photographer Spotlight- Anna Morgan

Hello all, I’m going to start a new thing on my blog- a mini review of various other photographers whose work I love! I hope you get as much inspiration out of their work as I do.

To get started, let me introduce you to Anna Morgan, AKA Bluetusk Images. I remember I first came across her work on Facebook, via a stunning flower filled forest scene. 

"Convergence"- Anna Morgan. Perfect carpet of flowers, fog, and a sunstar. Wait, a DOUBLE sunstar? Are you kidding me?!? The atmosphere is classy but ethereal, a hallmark of her collection. 

"Convergence"- Anna Morgan. Perfect carpet of flowers, fog, and a sunstar. Wait, a DOUBLE sunstar? Are you kidding me?!? The atmosphere is classy but ethereal, a hallmark of her collection. 

When I first see an image that speaks to me, I will make an effort to go to that artist’s website. I find it much more like visiting a “real” gallery than what I would get from a generic facebook or instagram page. I enjoy finding a site like Anna’s- which is simple, to the point, and filled with exceptional imagery. 

"Sand Etching"- Anna Morgan. 

"Sand Etching"- Anna Morgan. 

She has an eye for images with subtle color and an intimate feel that I really enjoy. She also has images from a very diverse selection of areas, spanning Africa, the PNW, Iceland, and the American Southwest- although you won’t find many iconic views. Indeed, a fair number of the images I couldn’t tell you the hemisphere, let alone the country they were taken in! There is also very little location info on the images. Some would think that a bad thing, I personally love that touch- it adds to the overall mystery and makes me feel like there is a still a world full of undiscovered places out there!


Anna was kind enough to do a brief Q+A with me via Email... 

"Kokerboom Sunset"- Anna Morgan. Very balanced and subtle compositions are her modus operandi, as in this serene desert shot. I also enjoy the unique feel of the landscape, I couldn’t begin to tell you where this was. Africa maybe?

"Kokerboom Sunset"- Anna Morgan. Very balanced and subtle compositions are her modus operandi, as in this serene desert shot. I also enjoy the unique feel of the landscape, I couldn’t begin to tell you where this was. Africa maybe?


Thanks for doing this! Let me start by noting that its immediately apparent from your gallery that this isn’t some passing hobby for you. There are years of work and a lot of travel miles represented in these images! How did you start and what drives you to do this? 

Thank you! I feel humbled that anybody would find my work inspiring.  Art has always been a part of who I am.  Art history classes opened my eyes to the influence of photography on contemporary painters, writers and philosophers of the day, and around the same time, I began experimenting with film photography. Studying to become a vet didn’t allow me much time for art so my camera gathered dust for a while.  8 years ago, fueled by a desire to see the Grand Canyon, my husband and I planned a road trip through the American Southwest where we discovered the overwhelming beauty of places like Zion and Escalante that I had never heard of before. That trip reignited my interest in photography in a big way and seemed like a natural way to bridge my interests in art, nature and science.  


I see you also have a lot of unique views in your shots, do you intentionally avoid popular areas or are you more of a reactive photographer, for example not pre-planning your compositions and just finding what speaks to you in the field?  

A combination of both.  I am definitely a reactive photographer but often I find a scene where the composition works but the light or conditions aren’t quite right, so I wait and go back when I know they may be closer to how I visualized.  Sometimes that may be later the same day but it could also be in a different season or another year.  I went back several times over three consecutive years before I shot ‘Convergence’. I wanted peak wildflowers to coincide with the right amount of beech leaf cover to still allow the sun’s rays to come through. I had hoped for a little more ground fog that morning but I went home happy enough! 

"Year's End"- Anna Morgan. Anna also shoots a lot of atmospheric and foggy conditions, which I am a total sucker for!

"Year's End"- Anna Morgan. Anna also shoots a lot of atmospheric and foggy conditions, which I am a total sucker for!

You also recently moved to British Columbia, what motivated that and how are you liking it? 

As a family, we were looking for a better work-life balance where the life part allowed easy access to the great outdoors.  London is so heavily populated that getting out from the city into wilderness is all but impossible on weekends.  We identified places which offered us this in combination with the right work opportunities and settled on Vancouver.  So far we are loving it and are very happy we chose British Columbia.


What the heck is Conservation Medicine and how will you be combining that with photography? 

After 12 years working as a small animal vet, I wanted to move away from clinical work into conservation.  Conservation Medicine examines connections between health in animals, people and ecosystems.  Put simply, the health of all species is inherently associated with the health of the ecosystems in which they live.  Damage to the environment caused, sadly, primarily by humans facilitates the emergence of new diseases or altered disease transmission.  Lyme disease is an example most people will have heard of.  

Photography can convey a powerful message when it comes to conservation.  I will be using my Masters dissertation to look at the use photography as a visual narrative to convey the threats to our landscapes and species, and how these images are interpreted. 


"Spirit of Snaefell"- Anna Morgan. Apparently Anna has also spent some time in Narnia? 

"Spirit of Snaefell"- Anna Morgan. Apparently Anna has also spent some time in Narnia? 

What was the most terrifying moment you have had in the field?  

There have been a few hairy moments! In 2015 my husband and I decided we would start exploring the Spanish Pyrenees where my maternal family are from.  It was early in the season - mid June - and quite warm, wildflowers were already carpeting many of the lower alpine areas but it had been a high snowfall year and the rivers were wild.  It started raining heavily that afternoon so after setting up camp, we took refuge under a covered picnic area as we ate dinner. We climbed into our sleeping bags as the rain turned into a thunderstorm and I remember thinking we’d be safe from lightning as there was plenty of higher ground around us. We slept soundly until the early hours when firefighters were shaking our tent telling us to evacuate immediately; the rapid snowmelt and heavy rain combination were threatening to overload the rivers.  We threw everything into the car and left immediately, crossing the only bridge into the valley, back to the safety of my parents’ house 2 hours away.  When we got back and turned on the TV, the bridge and multiple riverside homes have been swept away by the rushing water, and caravans were floating in the valley we had just come from.  Thankfully, nobody was hurt so it was a lucky escape and I am grateful for the actions of the firefighters that day.


What was the most ridiculous moment you have had in the field? 

When I was first starting out, we did a trip to Iceland one summer.  I really wanted to photograph puffins so I looked up all the areas where they nest.  I couldn’t get a good view anywhere despite their numbers.  One evening we found a small cliff where there were hundreds of them and I could see a spot where I could photograph them without disturbing them. Half way up I realised the cliff was far too steep to climb and getting down was a little scary.   All I came away with were a few cut and bruises, and I never got a puffin shot on that trip that I was happy with.  Now I can laugh about it but at the time I was pretty frustrated.  My husband still refers to it as puffin rage!


Favorite place/best experience so far?  

There are so many great experiences to choose from it’s hard to say.  One night that stands out was during our only trip to Death Valley quite a few years ago now.  We decided to head to mesquite dunes for sunset so we set off and didn’t see another soul the whole time.  I started scouting for compositions that would work.  There were some clouds in the sky but it didn’t look too exciting until the sun started setting.  As I was busy looking one way, the clouds started turning pink behind me and then they got redder and brighter until the entire sky one huge fireball, and the colour was reflected in the sand.  Initially I ran around like a blue-arsed fly trying to capture it but it was so vast and I was so excited I couldn’t concentrate or do it justice.  In the end I turned the camera off and just watched in awe. Those kind of sunsets don’t come around very often.  I haven’t seen one since that comes even close. 

"Cracks and Swirls"- Anna Morgan

"Cracks and Swirls"- Anna Morgan


What is your absolute dream location and conditions to shoot in the future? 

The younger me used to have a bucket list of places to visit but now I prefer to feel a connection to the landscape, so I would rather get to know the local area more intimately and photograph the conditions as they come.  That said, B.C. is a pretty large place and has a lot to offer so I have plenty of exploring ahead of me.

There are some locations I would go back to in a heartbeat.  Yellowstone is a photographers’ paradise with some incredible and unique landscapes, and I love the park for what it represents within the conservation movement.  Going back in winter season is a dream I hope to fulfill one of these days. 


I believe you also have a recent addition to the family, how has that changed your photography? 

A baby changes everything including all the things you previously took for granted… like sleep!  Time for photography is in short supply and to say it’s a logistical challenge juggling nap times, feeding etc while trying to find time to be in the field is an understatement. Every development stage brings its own challenges and my photography just has to adapt to those like everything else.  Personally, the hardest part has been that, for the time being at least, I have had to let go of the idea of enjoying the silence and solitude that were an intrinsic part of my creative process.  However, on many levels, this has meant that I am thinking more consciously about how the landscape speaks to me.


"World's End"- Anna Morgan

"World's End"- Anna Morgan

Any advice for those just starting out? 

Enjoy the creative process and allow yourself to be driven by your own curiosity without focusing too much on the final result.  Photography is a reflection of your own experiences and emotions so just go with it rather than trying to emulate the work of other photographers. I think the most important point is to remember that failure not only contributes to your learning but is absolutely essential to success, and applies equally to the technical and creative aspects of photography.


What/who are your inspirations? 

For me, nature itself is the ultimate inspiration.  It is a constant privilege to bear witness to everything the natural world has to offer and to feel a connection to the landscape.  The work of conservationists such as John Muir, David Attenborough and Jane Goodall has inspired me since I was very young, to respect and care for our environment.   Painters – whether it’s Rembrandt, Van Gogh or Georgia O’Keefe, I enjoy exploring how light and colour is interpreted on the canvas.

There are some incredible photographers around and the list of those that I admire or whose images or writing inspires me is probably too long.  To name a few; Cristina Mittermeier, Frans Lanting, Charlotte Gibb, Guy Tal, Adam Gibbs, Sarah Marino, Alex Noriega and Bruce Percy.  Above all, the individuality and personal creativity in their portfolios is clear and this is inspiring in itself.

To see more of Anna's work you can find her site here. 

Irix 11mm f/4

I recently bought an Irix 11mm Firefly lens for Nikon, and had a chance to test it “in the wild” on a trip to Lake Superior. Below is a quick and dirty, thoroughly non-scientific review for any interested parties. I’m not affiliated with Irix, these are just my own observations... 


The Irix is a manual focus, electronic aperture prime lens. Irix is a relatively new name in the industry, but my impression is that they aim to fill a niche of high quality wide angle primes at low prices. The build quality is indeed very nice. Focusing is smooth and the lens seems like something that will not break or die anytime soon. The lens is not exactly tiny, but considering the 11mm view, the size and weight are not obnoxious. It seems slightly smaller and lighter than my Nikon 14-24 2.8. 

"Northern Reach"Waterfall on the shores of Lake Superior. Irix 11mm at f/16, 1 second. In this case 11mm was really helpful, as the clouds were arcing high overhead, and the prominent foreground ridges lended themselves well to the wide view, a…

"Northern Reach"

Waterfall on the shores of Lake Superior. Irix 11mm at f/16, 1 second. In this case 11mm was really helpful, as the clouds were arcing high overhead, and the prominent foreground ridges lended themselves well to the wide view, adding lots of depth to the scene. I was probably less than 10 feet from the waterfall! 


There are a lot of nice touches to this lens. One I love in particular was the addition of a click stop on infinity focus- something I hope manufacturers add to EVERY lens from now on. (And, infinity IS actually infinity, at least on my copy!) Another cool feature is the rear gelatin filter slot. This lets you put tiny resin ND filters behind the lens without any sort of holder on the front of the lens. The design is pretty good, I added/removed filters in the field without problems, although I would not want to attempt it in inclement weather or dusty conditions. The gelatin filters come in a pack of 15, and it works out to about $1 per filter. The only downside to these filters is that they are not realistically reusable, at least not if you are a big clumsy oaf like myself. (Removing them, I would almost always get fingerprints on the filter, etc.) There are third party filter holders for this lens on the market, but they are about $500 for the holder and $500 for each 180mm glass filter, so I think I will stick with the gelatins for now! 

Flare seems well controlled, this is a single shot with no flare spots removed. Be aware the sun can be well out of your frame and still create flare spots in a lens this wide. 

Flare seems well controlled, this is a single shot with no flare spots removed. Be aware the sun can be well out of your frame and still create flare spots in a lens this wide. 


Optical quality and sharpness at f11-f16 holds up well compared to my normal ultrawide- the Nikon 14-24mm. Unfortunately, I didn’t have a chance to try any night/low light shooting with it, so I can’t say how well it performs at f4 (max aperture) just yet. Suffice it to say that I am pleased, and have not had any sharpness issues on a high resolution body (D850).  On a side note, I also threw it on an infrared converted DX body, and it seemed to work well. Distortion seems controlled. I had no issues shooting at the Great Lakes, where straight horizons quickly reveal typical distortion issues. 

Stormy spring weather on a walk near my home with the family. The ultrawide 11mm perspective lends itself well to creating depth out of any repeating patterns. 

Stormy spring weather on a walk near my home with the family. The ultrawide 11mm perspective lends itself well to creating depth out of any repeating patterns. 


So, a quality lens with a good price, and a focal length previously unreachable to Nikonians. Pretty much a no brainer for me! Keep in mind I am a manual focus guy with wide angle work. If you are an autofocus junkie you might not like the manual focus. There are a few peculiarities that I would also like to bring up regarding shooting at 11mm, for those on the fence about buying a lens this wide. These points aren’t really specific to the lens, instead general observations about the practicalities of shooting at 11mm in the field. 


One of the main concerns I had about buying this lens was whether it would really be that different than the 14mm I already had. Well, that was not an issue! This thing is a whole new REALM of wide. Yes, this will 100% allow you to frame and capture things you could not before, if your widest is 14-16mm. There are both good and bad sides to this… 

Some test shots on our back deck. Top to bottom- 14mm, 11mm, 16mm fisheye. You can see the Irix is just about as wide as the fisheye without the distortion! 

Some test shots on our back deck. Top to bottom- 14mm, 11mm, 16mm fisheye. You can see the Irix is just about as wide as the fisheye without the distortion! 


The good is that all the things a normal ultrawide excels at- adding depth to tight spaces, capturing lots of sky for night work or storm chasing, near/far foreground progressions- this lens knocks that stuff out of the park easily! I’m confident there are places at the base of many well known waterfalls that were unshootable before, that this lens could capture- simply because you can fit so much more in the frame.


The bad- 11mm is so freaking wide it is comical. Shooting with it requires some careful thought and composition. All the things that are wonky on a 14mm- distortion, leaning trees, etc are magnified intensely. In the forest you can pretty much forget about tilting your camera up or down at all, unless you like crazily leaning trees in every direction. As with all ultrawides, it also smashes whatever is center frame wayyyyy into the distance, so you will need an EXTREMELY prominent subject to stand out. Even towering peaks can look shrimpy in this lens. On a similar note, the foreground is so wide that you need not only a good patch of flowers/mud cracks/etc, but a very LARGE foreground area, or you will end up with huge empty zones in your image. 

Bokeh at 11mm? It does exist, although the practicality is questionable. Still, a fun lens to chase kids and friends around with. Here grubby kid hands are just about touching the lens. 

Bokeh at 11mm? It does exist, although the practicality is questionable. Still, a fun lens to chase kids and friends around with. Here grubby kid hands are just about touching the lens. 


All that being said, I’m glad I added it to my bag, and look forward to playing with it in the future. It isn’t going to be my first choice in many situations, but when it is needed it performs admirably, and can do things no other Nikon lens can do! 


Strengths- 

  • Areas with large, strong foreground features
  • Towering peaks/waterfalls etc
  • Tight quarters, a la slot canyons, caves, etc
  • Anywhere you want to exaggerate depth or leading lines
  • Anywhere you may need/want a lot of sky in your shot, aurora, storm chasing, etc
  • Ridiculously comical portraits of your friends and loved ones


Weaknesses- 

  • Pretty much any scene where you are not 100% surrounded by awesome, because this lens will easily fit EVERYTHING in the shot (often including your tripod legs and feet if you’re not careful!)
  • Anywhere with a lot of prominent straight lines like tree trunks


"Jurassic Coast" Irix 11mm, Pictured Rocks National Lakeshore 2018

"Jurassic Coast" 

Irix 11mm, Pictured Rocks National Lakeshore 2018


-Zach 


How much is too much?

Yep, I’m going there. Get a mouthful of hot coffee ready to spit. If you have angry emoticons, now will be the time.

Let me start with a disclaimer. The following is not meant to be interpreted towards anyone else’s work. I am not trying to dictate a manifesto to the community, instead jotting down some thoughts that have been guiding my hand more and more as the years go on. So why publish this? Because it is undoubtedly one of the most common questions I am asked! And, it’s a lot to explain.

I have come to think of myself as an artistic photographer, at least that is the intention of my work. I constrain my photographic art with two opposing principles, which I will argue the points of below.

1.      If I manipulate an image too much, it’s not photography.

2.      If I don’t manipulate an image enough, it’s not art.

That last point was the cue for the purists to spit the coffee, in case you missed it.

I’ll start with point #2, since I think most of us can agree on point #1.

Art has never been about reality exactly as it is. It is reality reimagined, reality improved (or destroyed), reality through a thousand different mirrors. If art were limited to strict interpretations of reality, how much less our lives would be! Therefore if you dare to call yourself not just a photographer but an artist, you had better be manipulating your images. Before I get neck punched- let me examine the definition of the word.

manipulate

1. to treat or operate with or as if with the hands or by mechanical means, especially in a skillful manner

2. to manage or utilize skillfully

3. to change by artful or unfair means so as to serve one’s purpose

It is a word with both positive and negative connotations.. An artist can skillfully manipulate a sculpture by the first definition, but when people say a photograph is too manipulated, they are using the not so great definition of the word. Trickery. Illusion. Unfair means to serve one’s purpose. That sunset wasn’t that colorful, those stars weren’t that bright, etc.

I proudly manipulate my work by the first definition, and attempt to steer clear of the third, although the gray areas here are bigger than the Death Valley playa. It is my opinion that when you have the best tools ever created for controlling the look, feel, and color of your images, (as we all do in 2018) it is silly and archaic not to use them. Indeed I would argue it is almost neglectful, if you really care about what you are creating!

How do I manipulate my images? Let me count the ways, in descending order of importance.

1. Location/Conditions

No other decision will shape your portfolio more than what you choose to shoot. And yes, flying to Iceland for a week will most definitely come under any definition of manipulation- if it didn’t radically change your photos, you could just stay in your backyard! Choice of subject will define who you are as an artist more than any other decision you make.

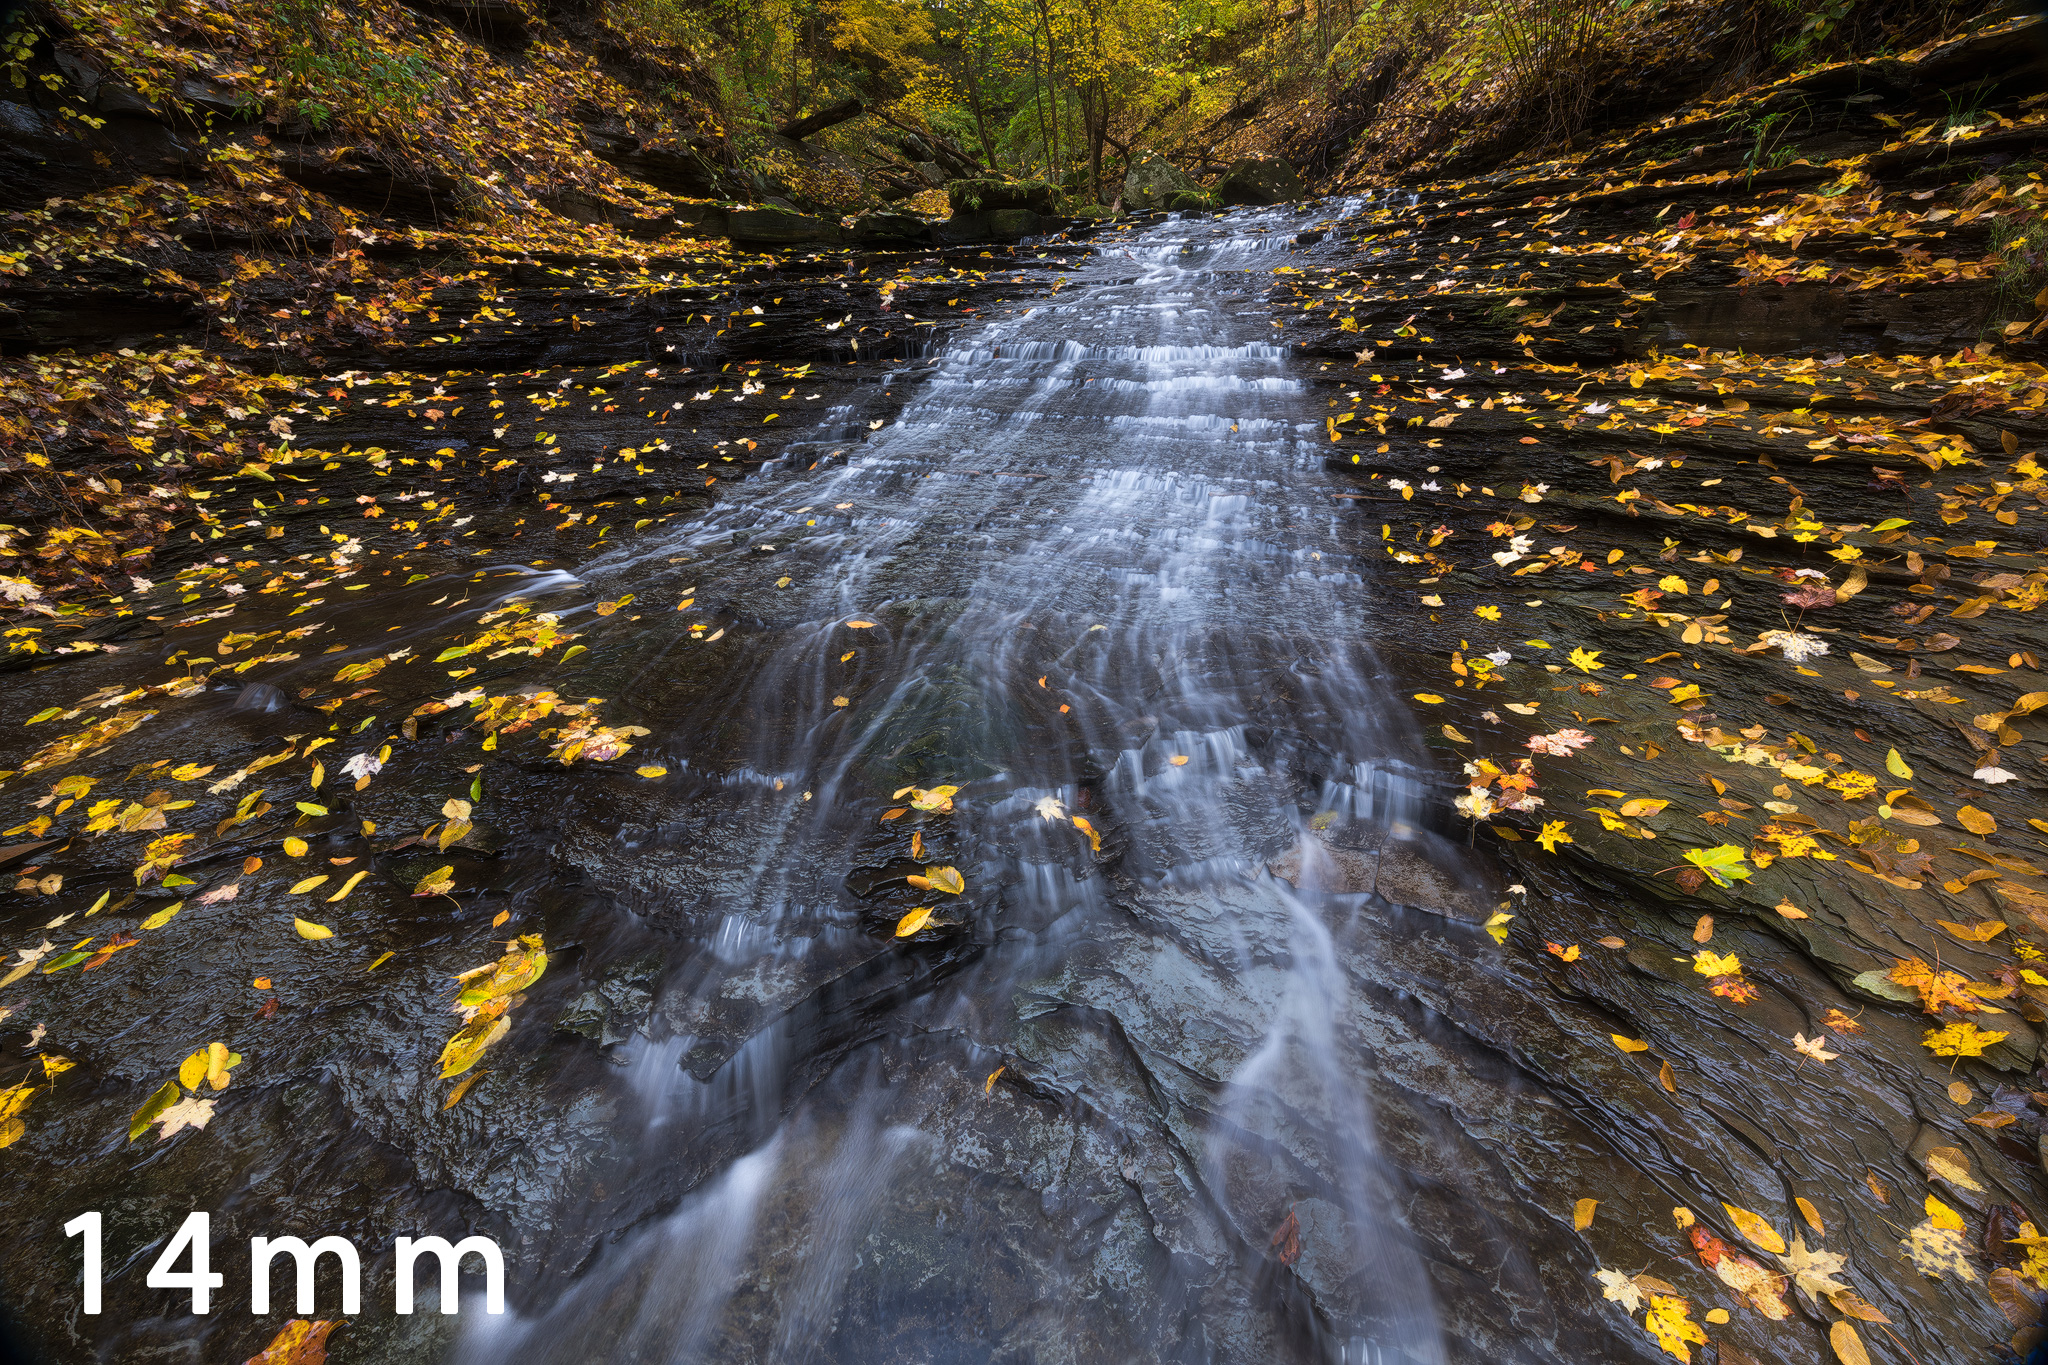
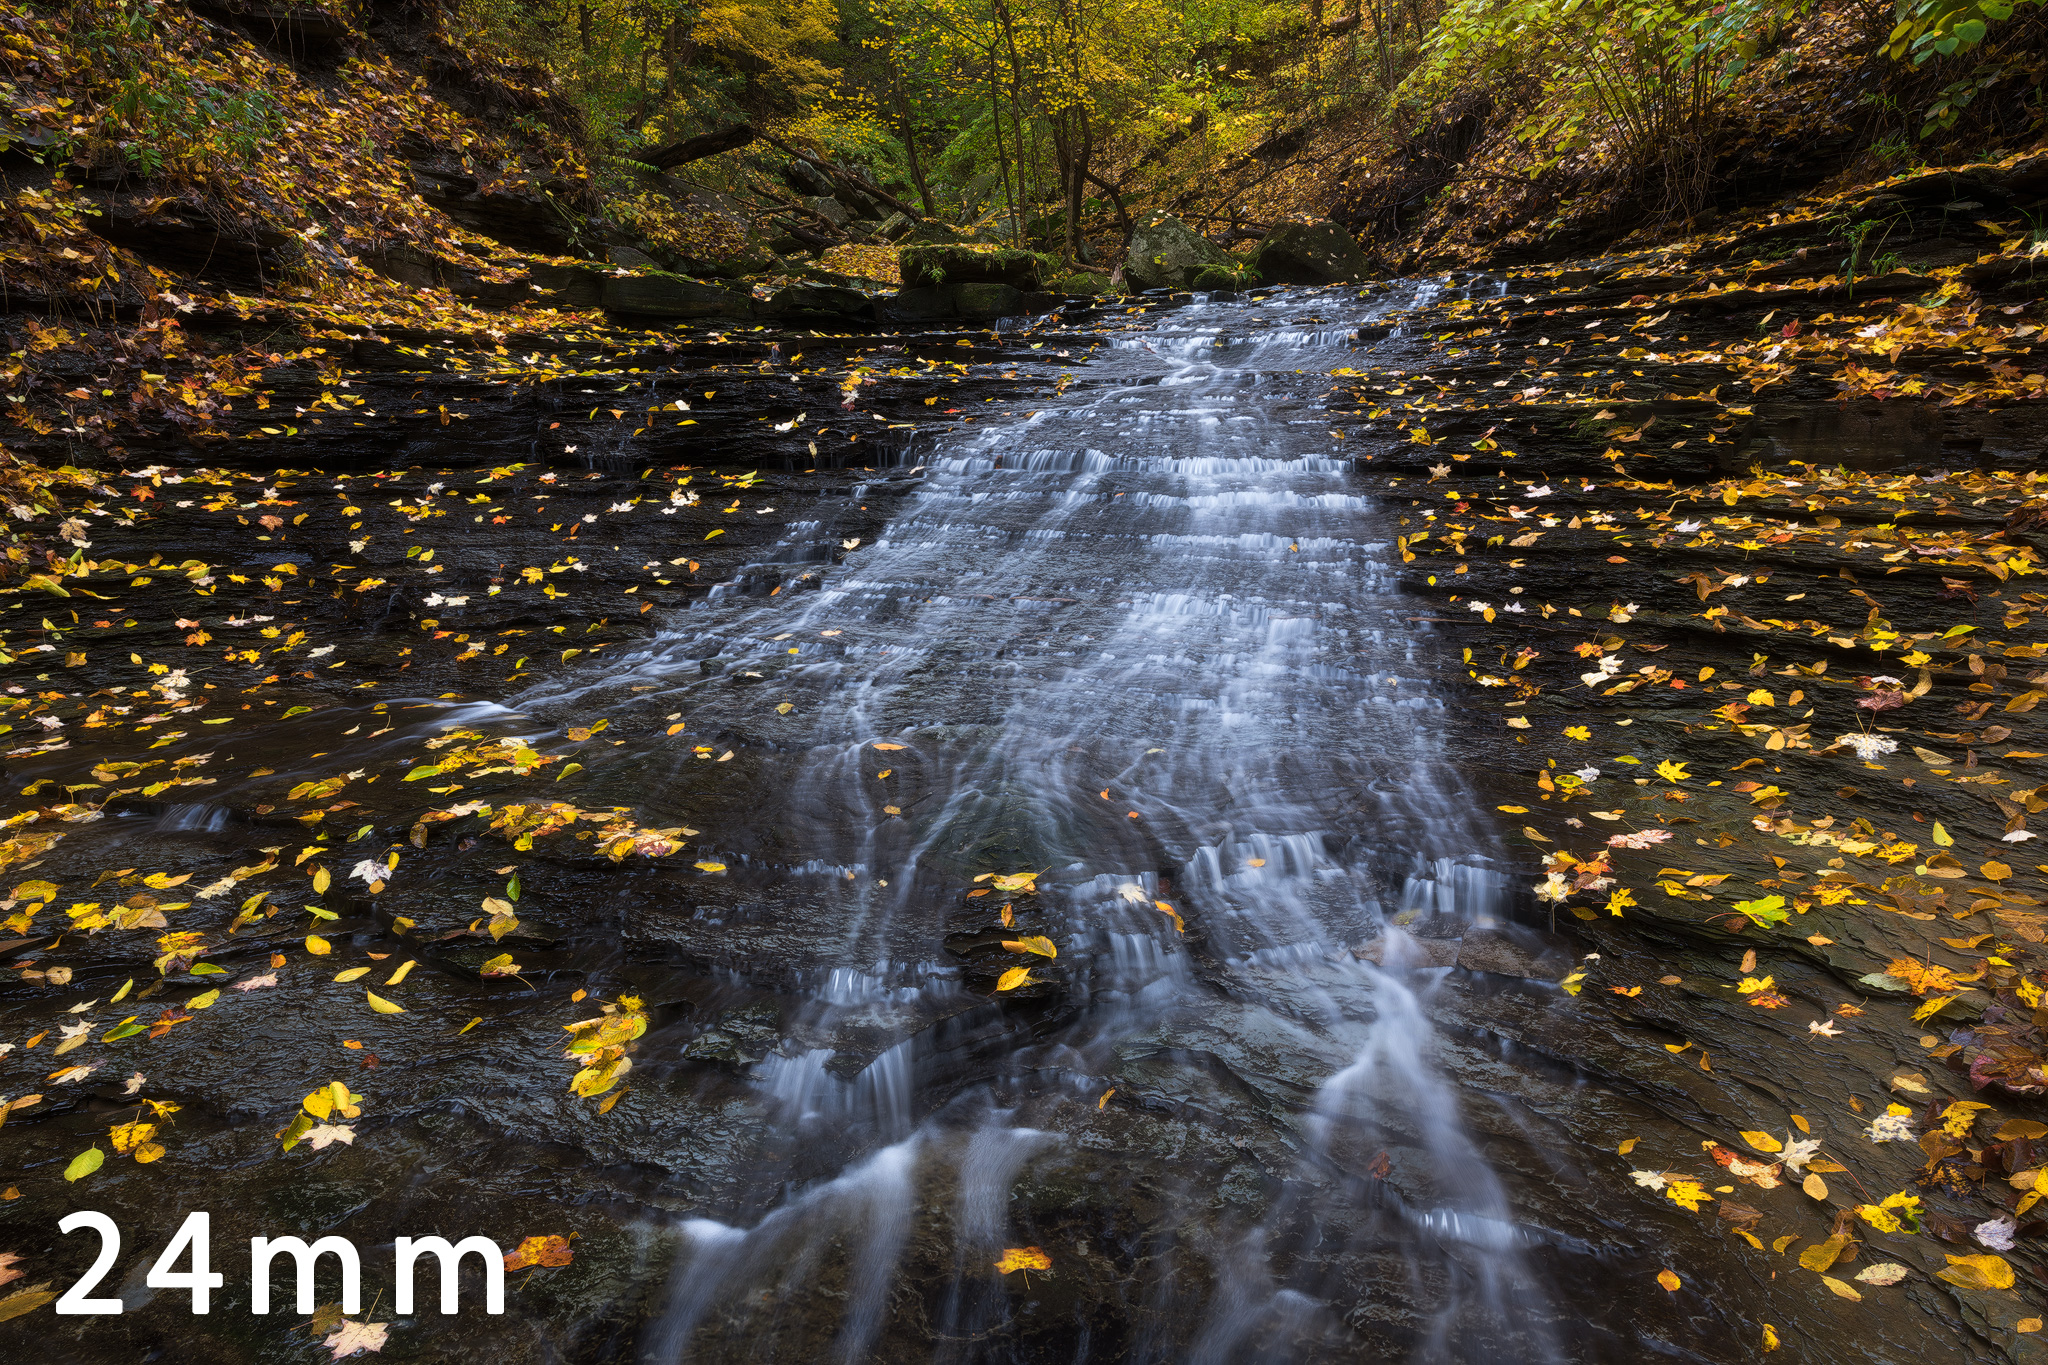
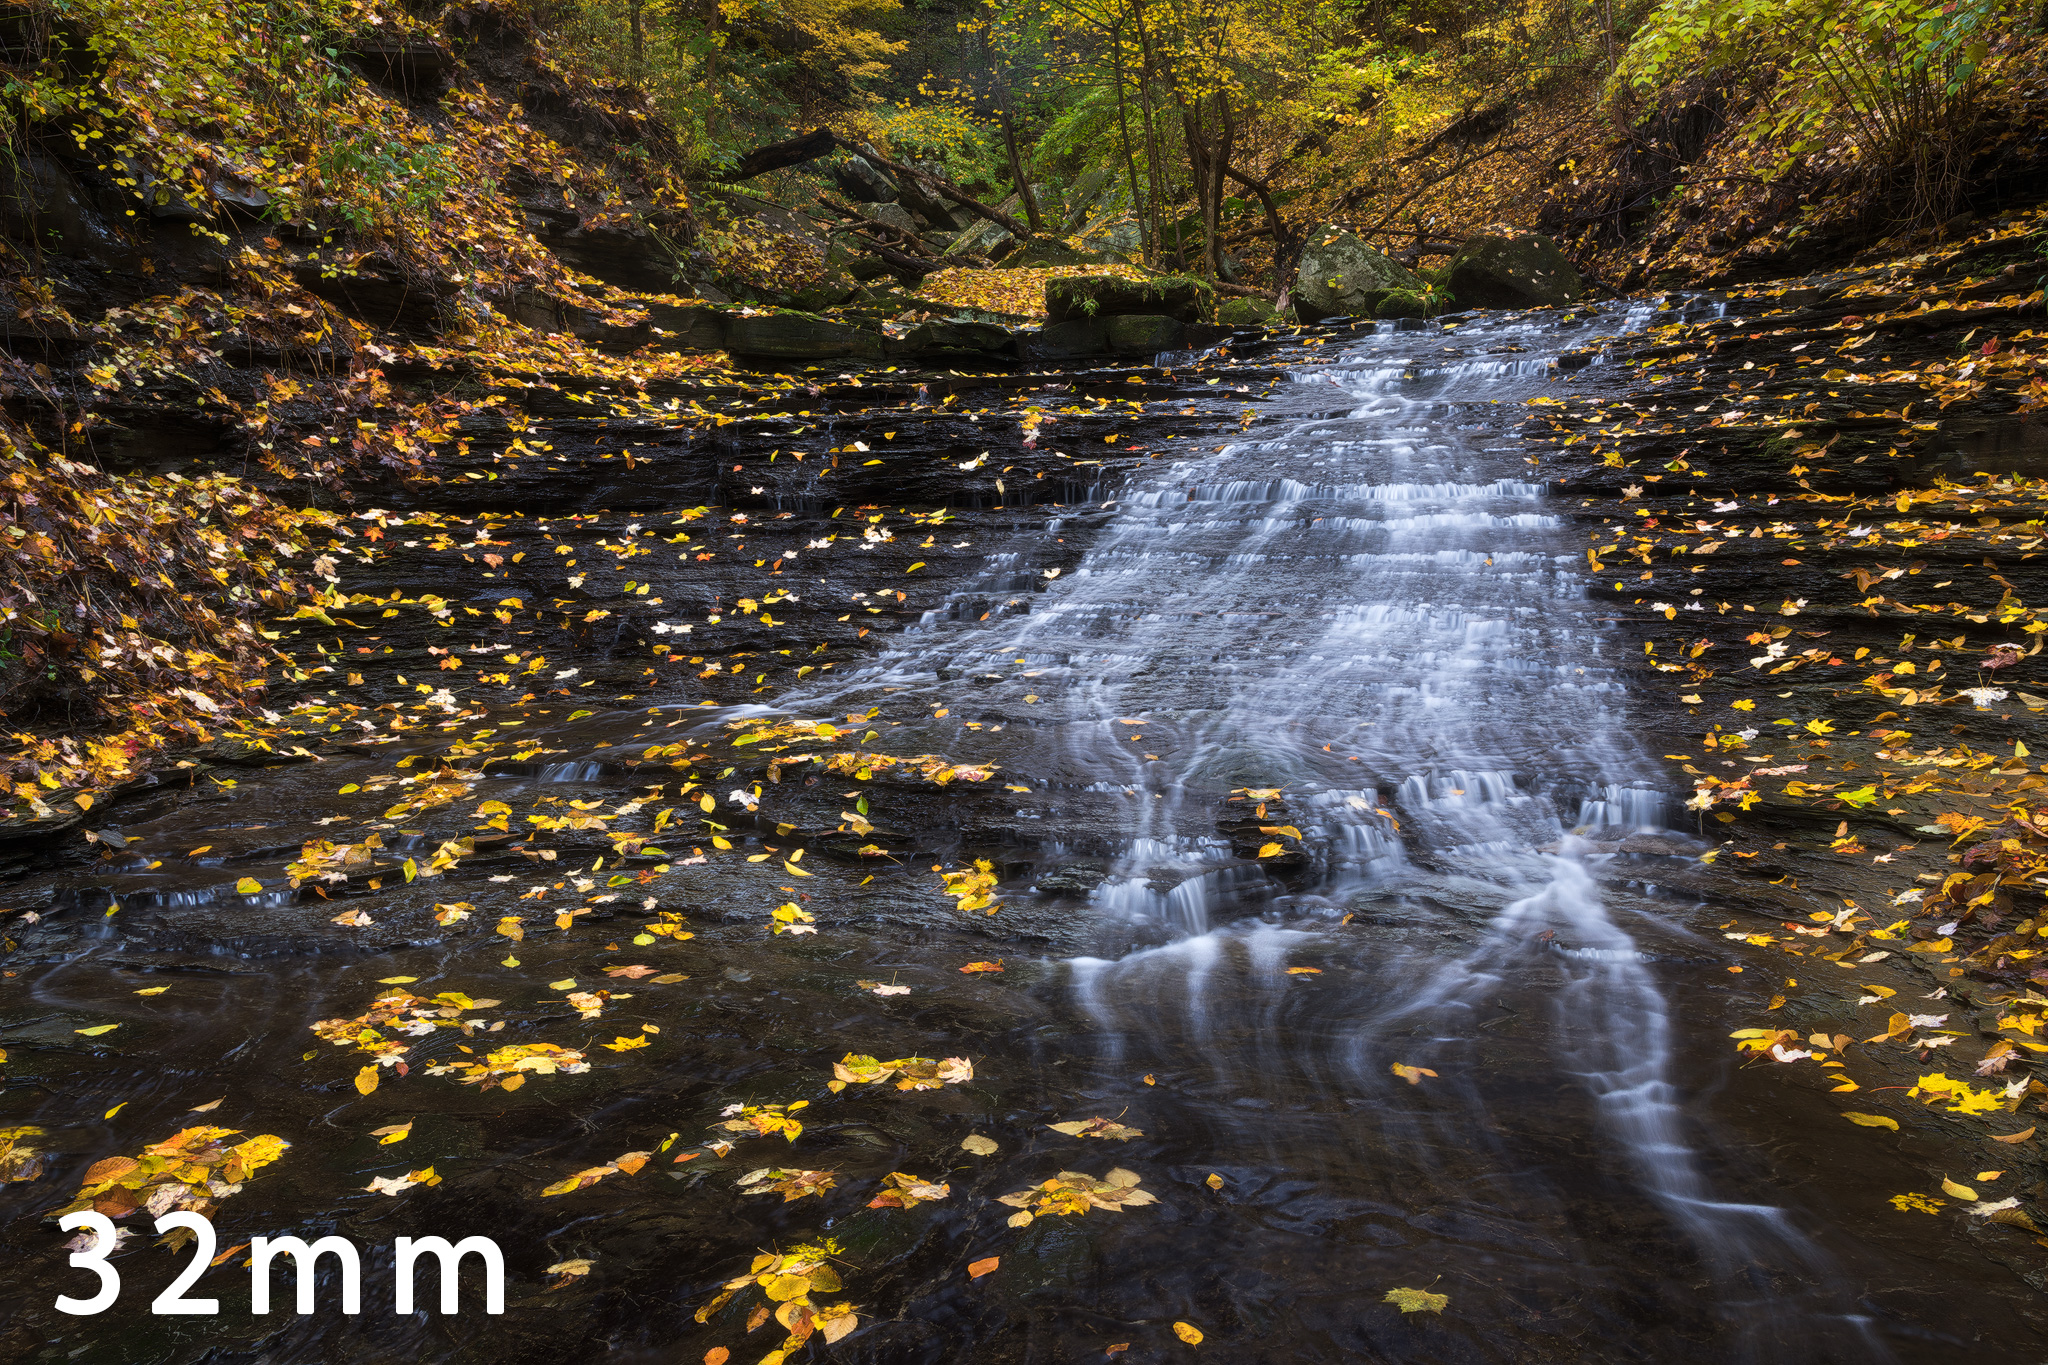
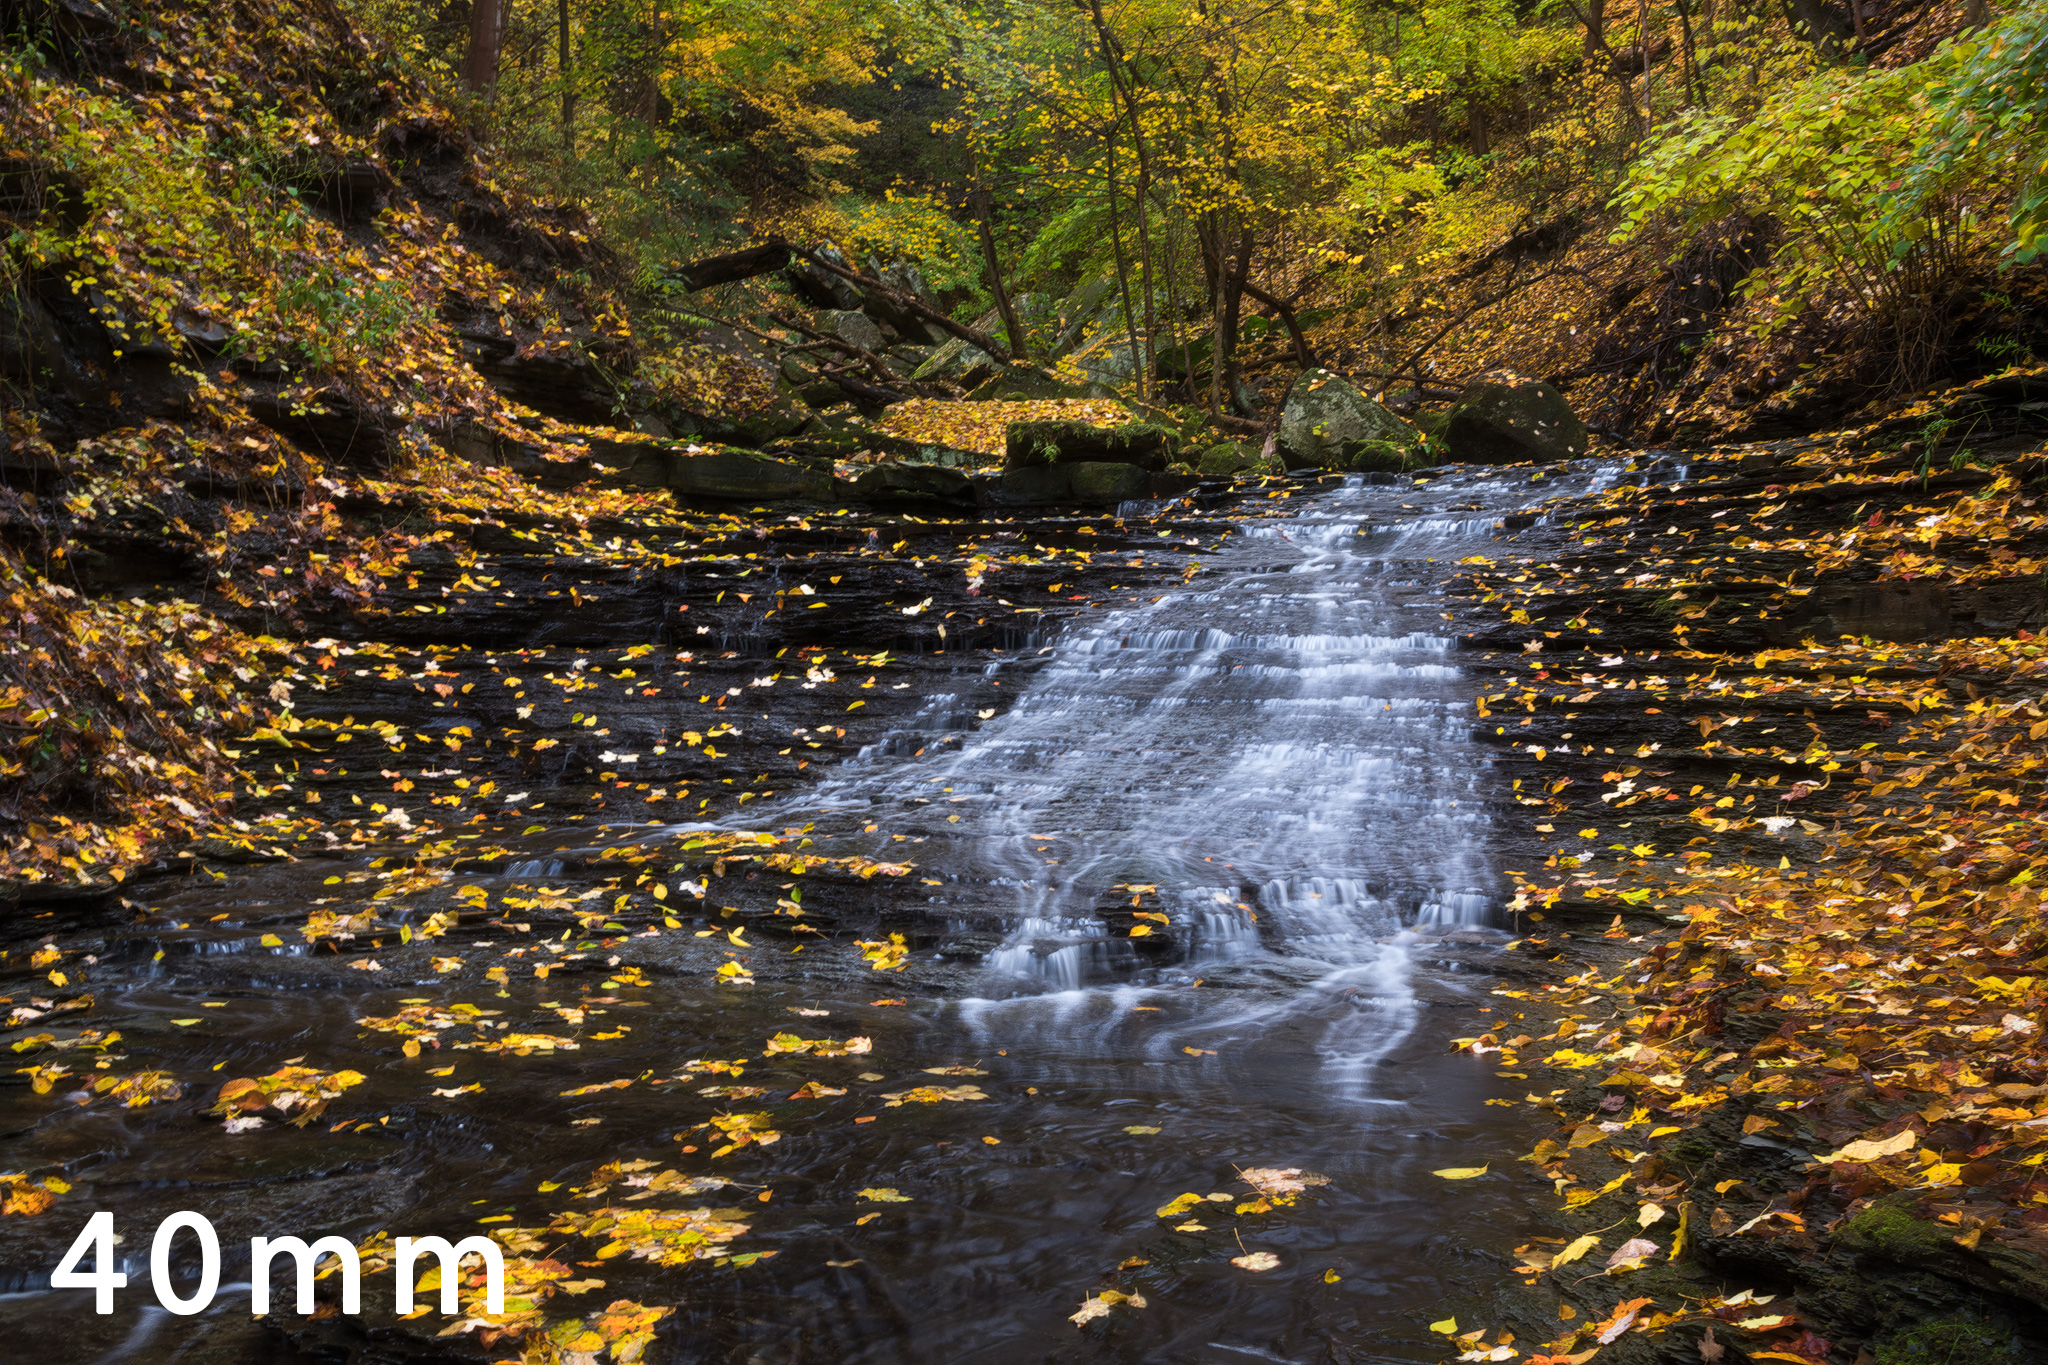
2. Lens and composition

The choice of lens and the arrangement of objects in a scene can completely change the look of a place to the point that it is unrecognizable. Perspectives can be very deceptive. A wide angle lens can make foregrounds tower over distant mountains. Telephoto glass can compress and layer tiny scenes in the distance.

3. Post processing

The least important aspect of your work as a photographer. Don’t believe me? There are pros who shoot film and don’t even bother! That’s not to say it isn’t important at all, of course- just that I can change a lot more about my images with where I stand than I ever could on a computer. And yes- I find the notion that using digital editing is somehow different from the myriad of other ways we manipulate our images to be strange indeed! Imposing your intent on a scene is always what artistic photography has been about.

Looking at the above categories, I can come to no other conclusion but that every one of my photos is highly manipulated. I choose the land, I choose the light, I arrange the composition, I process. Each and every one of these steps is either intentionally or subconsciously guided by my mind, which has been shaped by my life and experience. I will make choices that will differ from what anyone else would have done. Cumulatively it makes my voice different, even if only a little. That is an important part of what makes art! Remove the intent and guidance by the artist’s hand (manipulation) and you are left with a snapshot that literally anyone could have created.

So now, can’t I put a giant moon behind the milky way behind a rainbow over the grand canyon and call it good? Do I even need to leave my house anymore?!?

Well, now we bump our heads on that Opposing Principle-

If I manipulate my images too much, they are not photography.

Yes, ever since the beginning of art, it has been about manipulation. And photography as art has not been excluded from such- but there is a very important caveat. Outdoor photographers have always been seen as emissaries of truth. Witnesses to wonders, spectacles so seldom seen that they unfold once every several lifetimes, or perhaps never again. By choosing to label myself as a photographer rather than a digital artist, I can’t help but feel I have a responsibility to carry the truth to my viewers. No matter my personal intentions, the viewer will have an expectation that they could one day climb that very same peak, feel that wind in their face. That feeling is a big part of the magic of photography- to be awed by what exists! I cannot completely disregard the notion that the magic is under assault these days, and I see that digital manipulation is somewhat to blame. People don’t believe what they see anymore. It saddens me.

About a year ago, one of my favorite photographers posted an image of great and simple beauty- a lake, with glowing peaks towering above still waters. The image was almost immediately assaulted on social media. I don’t remember the exact words, but the basics were- “I’m tired of all this Photoshopped beauty.” The processing was subtle and tasteful, and the lighting completely natural to my eye. It broke my heart, not only for the artist who was unjustly assaulted, but also for the assaulter! How jaded do you have to be, to doubt even the most basic presentation of natural beauty!

I have encountered people who doubted milky way photos, not because of the processing- but because they didn’t believe you could actually see such a thing! They literally did not think the milky way can be seen. One of my strongest childhood memories is from time spent high on Colorado nights, looking up at that vast and dusty expanse and feeling so very small (in the best possible way). Such sights used to be a quintessential part of human existence, during times when we spent more of our lives outside than in.. I hate that people don’t believe such beauty is real anymore. I can’t, won’t add to that. 

I should say that I don’t hate things that are created- not at all. There is amazing, powerful digital art created by people who are absolute geniuses in the field of compositing and CGI. I love that stuff! Yet, how long will it be before one can get to the front page of 500px with an image of somewhere that simply doesn’t exist? It’s starting to happen already. I have seen foregrounds from Norway in front of the Canadian Rockies, and foregrounds from Utah with Sedona spires in the background. I was impressed! The processing looked great! Yet, it is not something I would feel comfortable calling a photograph, were it mine.

Of course, I realize that I am firmly in the Gray Zone with my own work, and surely many would judge it unrealistic. Everyone must forge their own path in this brave new world, and I am A-OK with being judged- it’s just part of putting your work out there. To allow myself to critique my own work in accordance with the principles above, I have made a three level reality-rating system. It’s a bit like the hurricane scale, but with less destruction and terror.

Cat 1- Things that really happened.

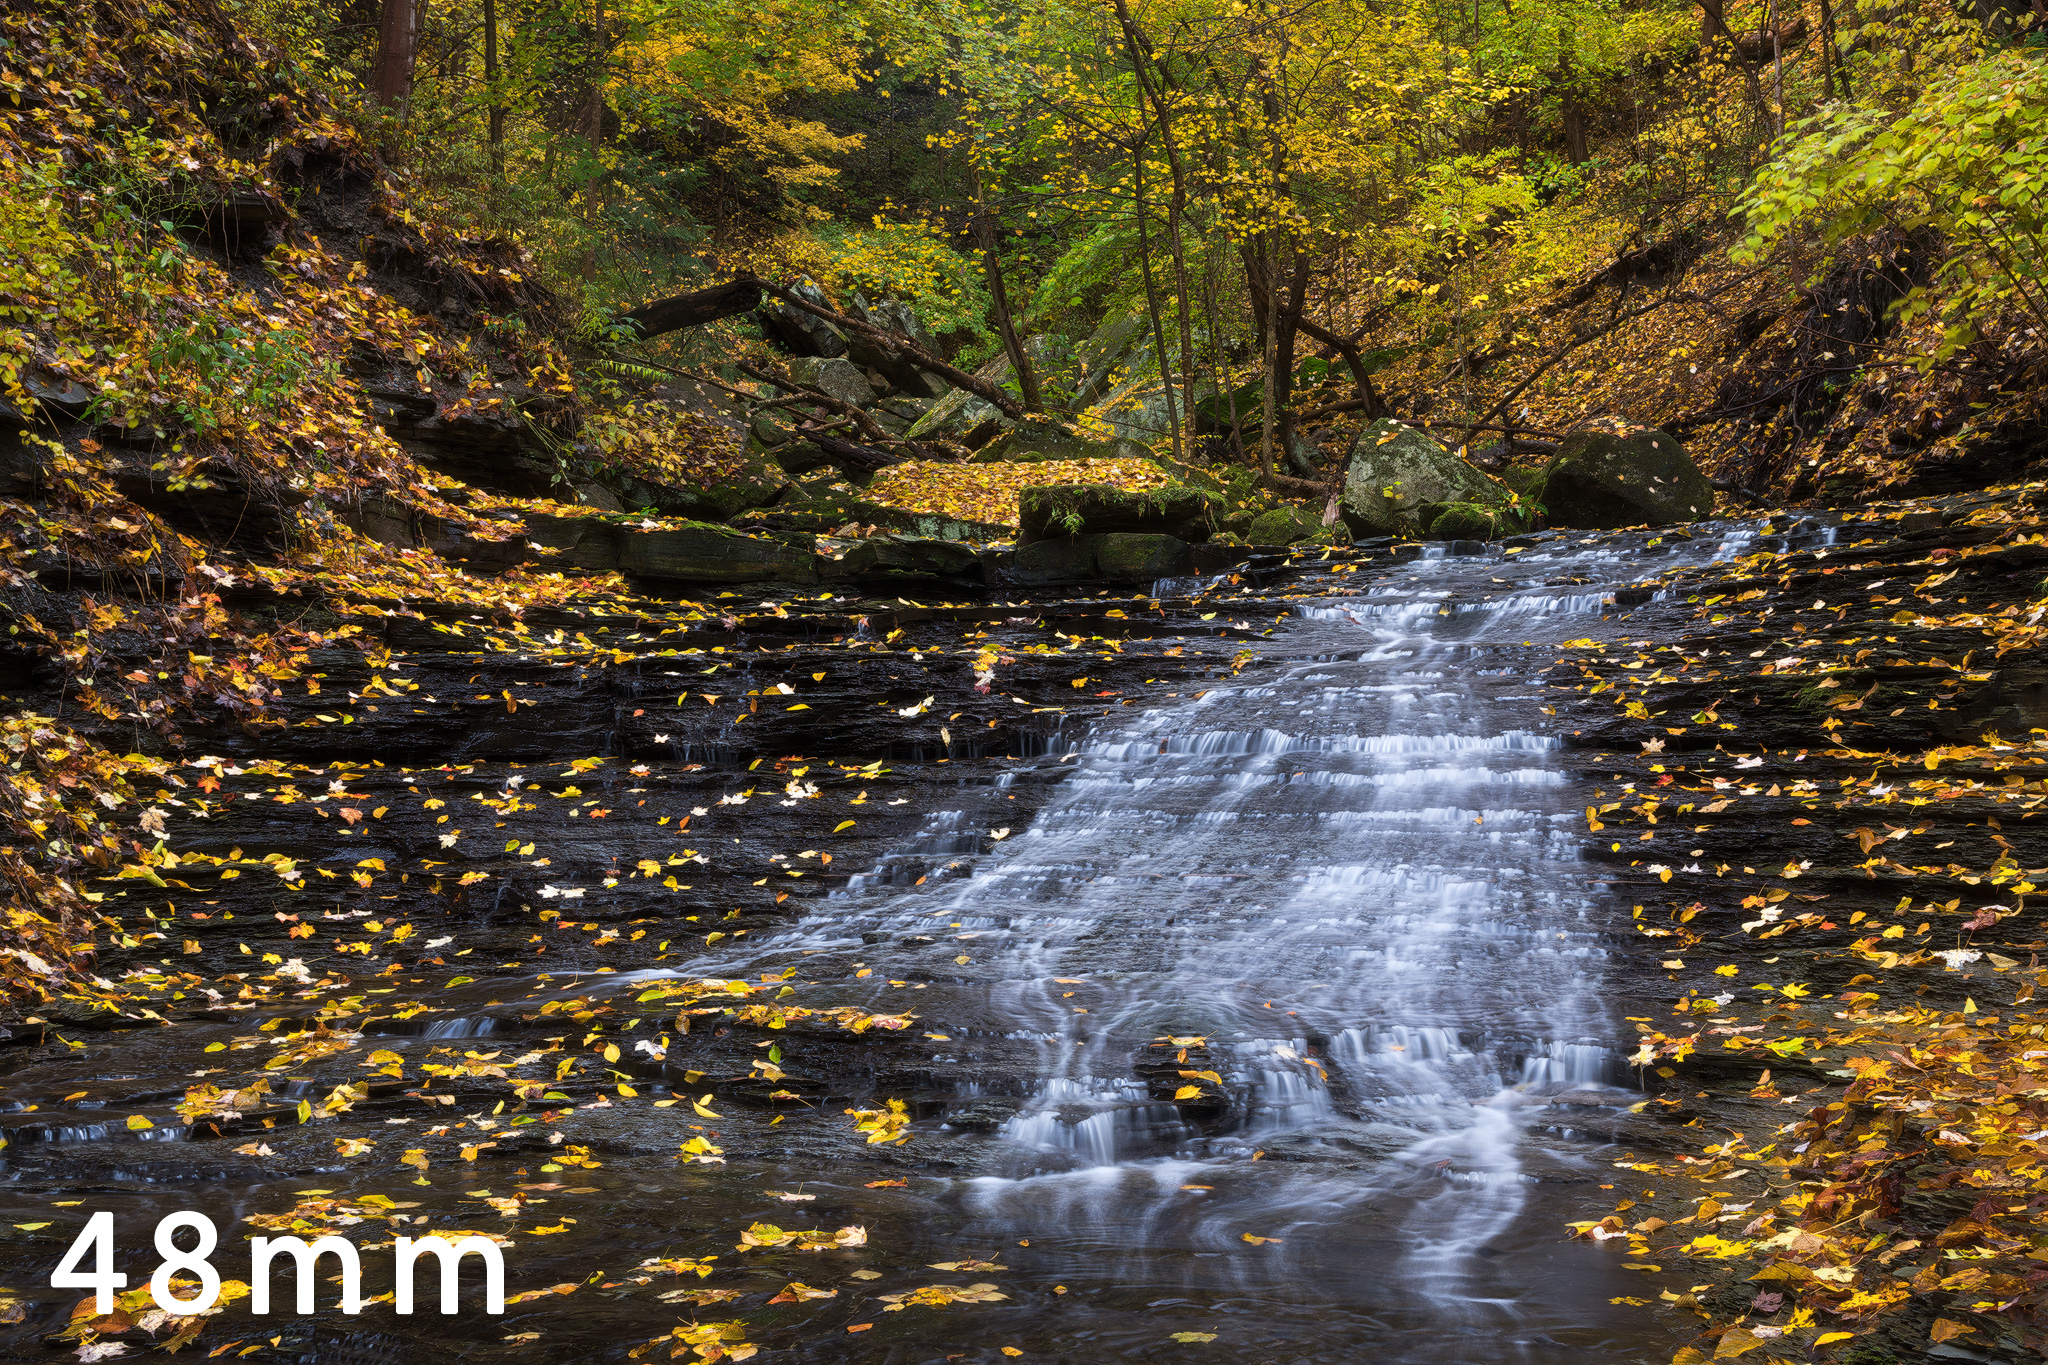
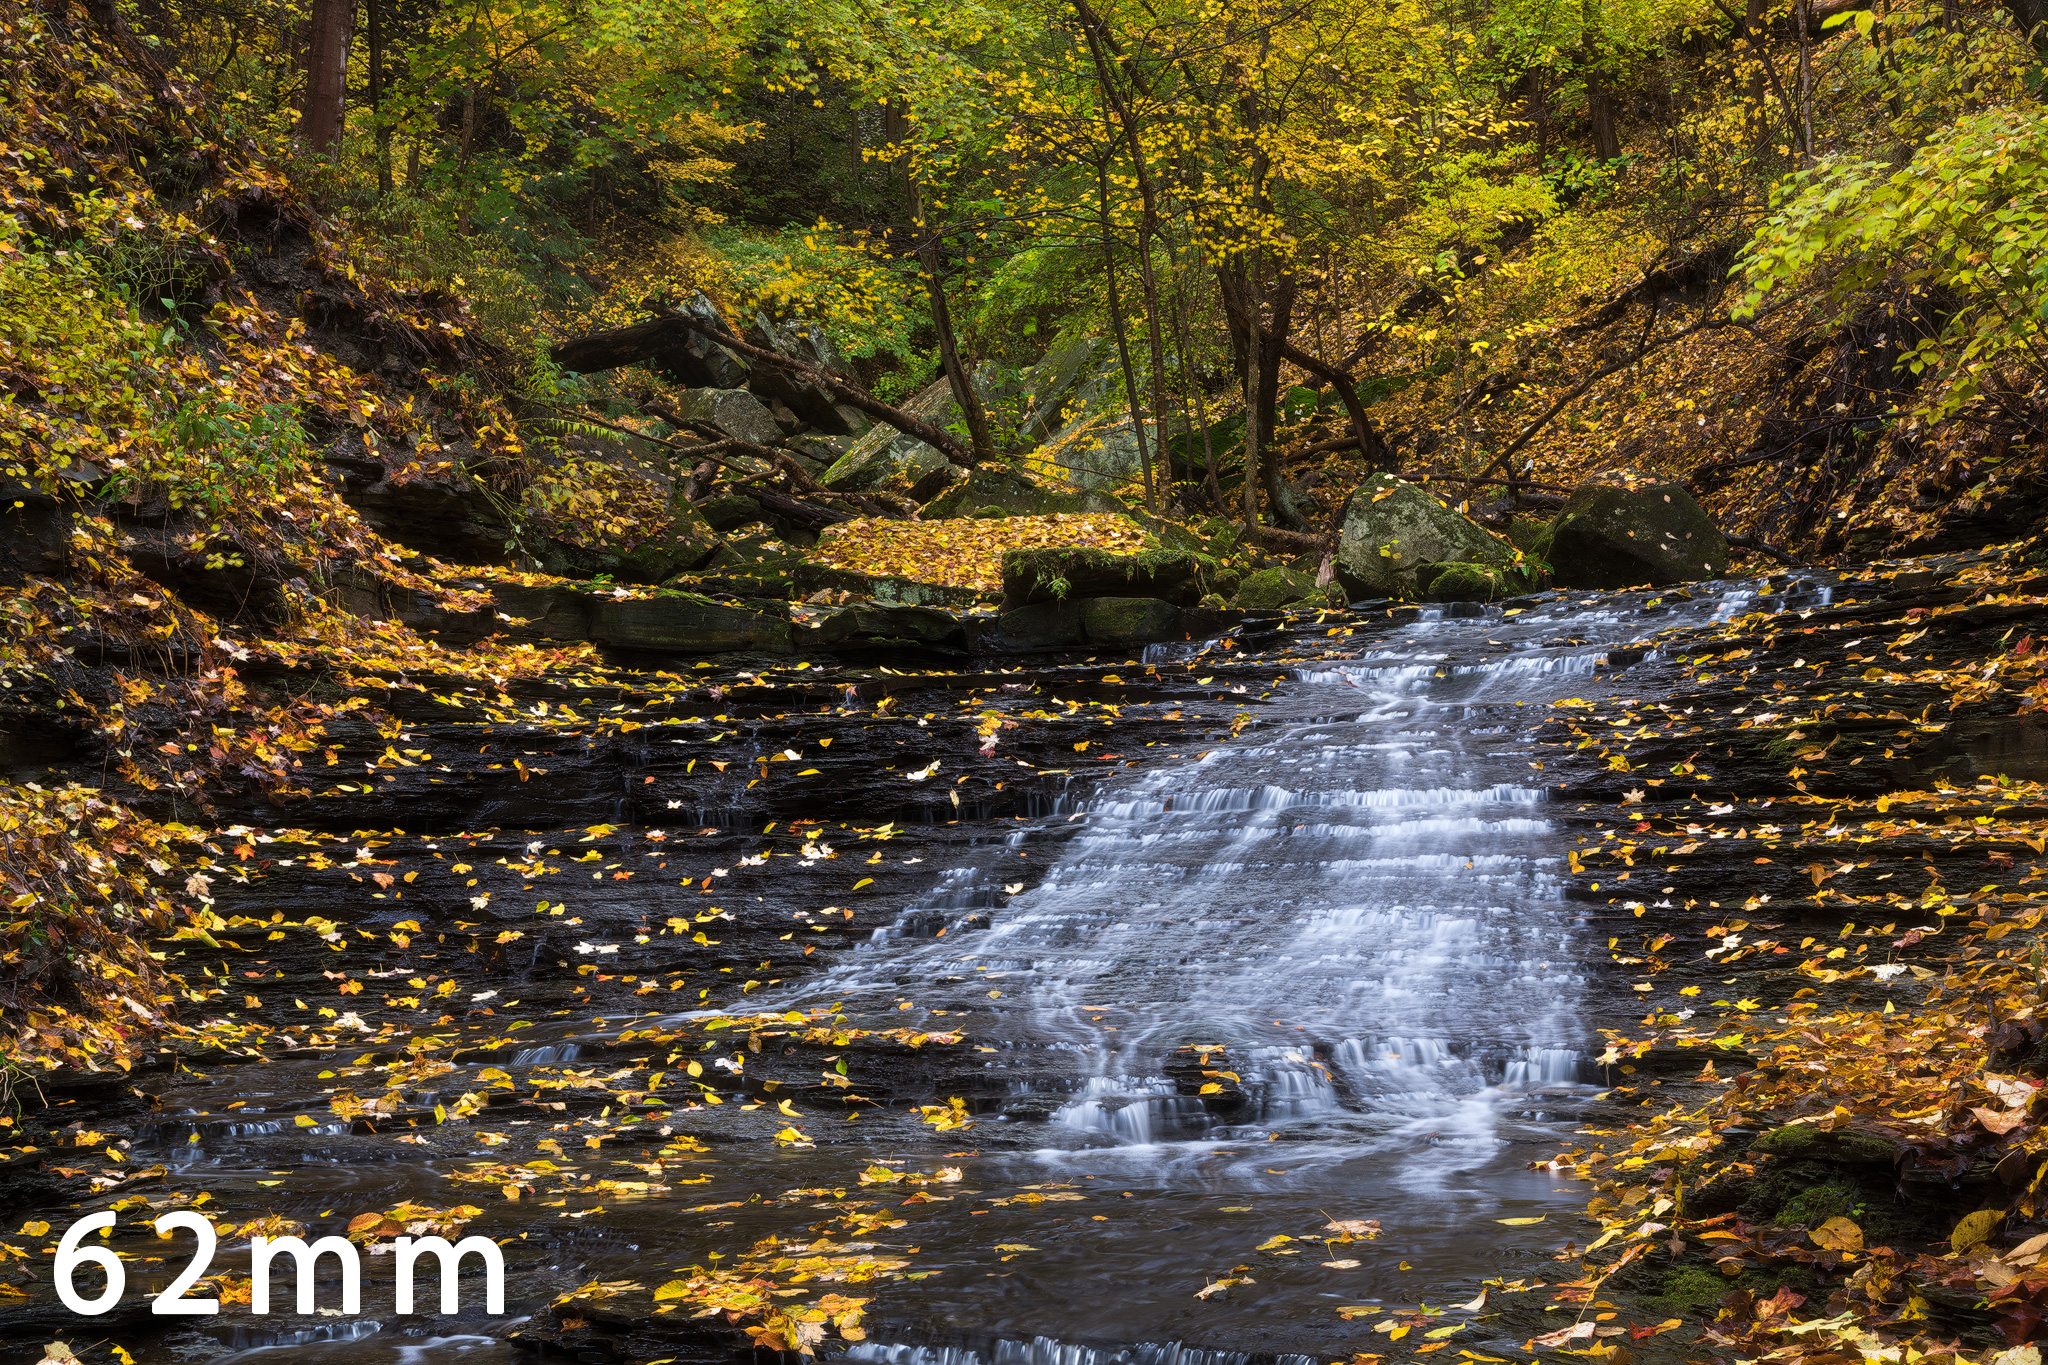
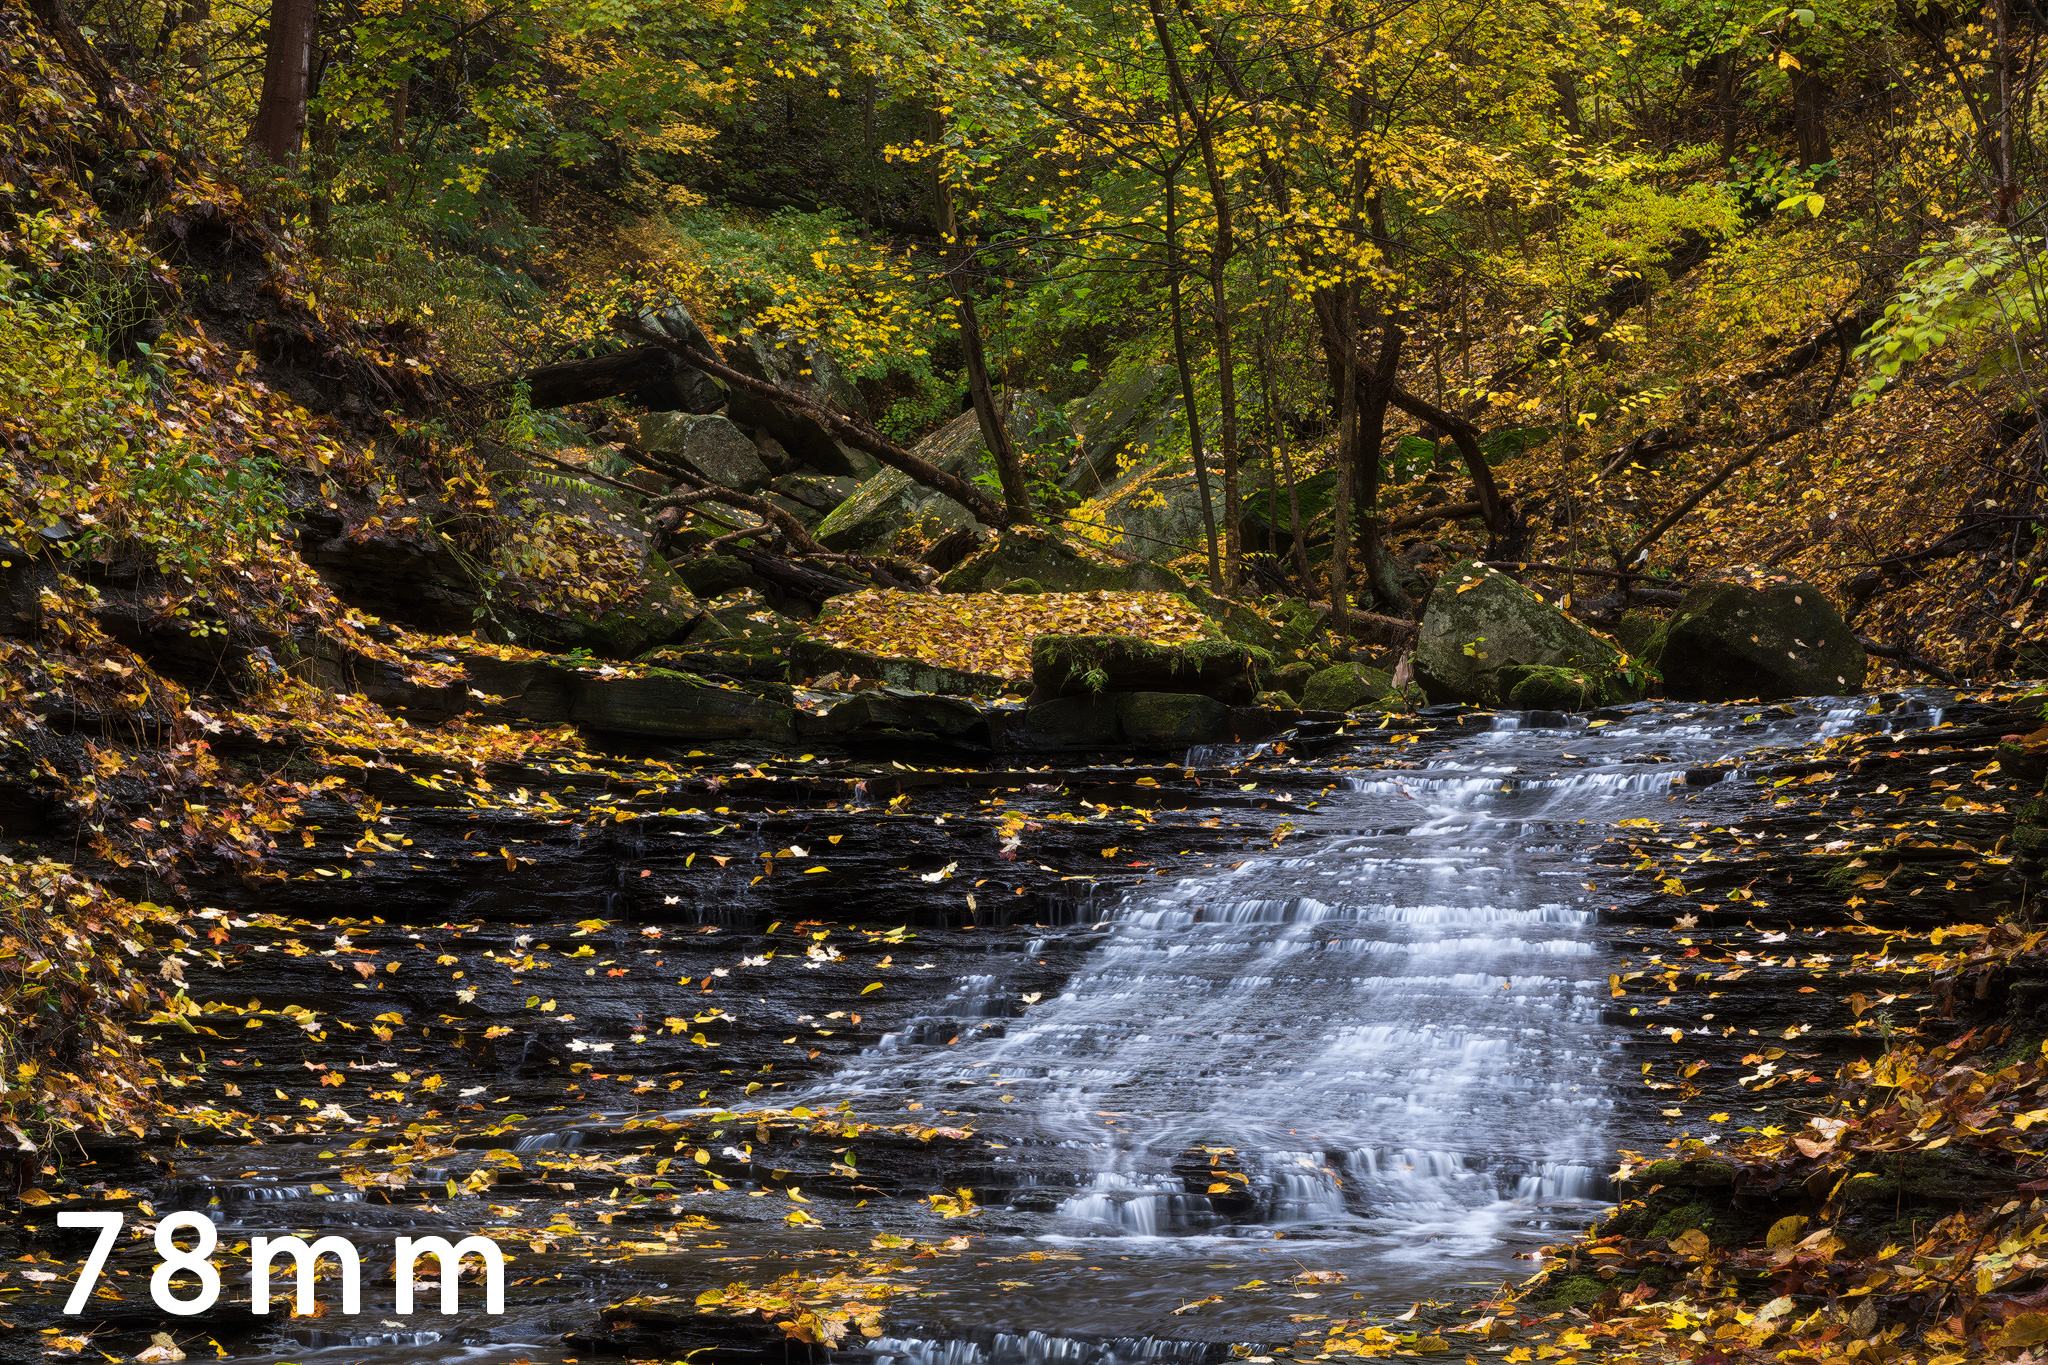
Pretty self-explanatory, but I should elucidate that something that could not be seen with the eye can still fall under this category. For example, long shutter speeds blurring water- really happened, although it didn’t look like that to my eyeballs. Stars and milky way- same deal, provided they are not edited to look like space fireworks. Infrared is another good example- you’ll never see it, but it is still firmly in the realm of Things That Exist. Heck, let’s throw monochrome in here too. At the risk of another neck punch, I will say that I consider most forms of warping in this category as well. Why? Because wide angle lenses distort the heck outta stuff anyways. Don’t believe me? Take a wide angle shot with an object in the center, then another with the same object in a corner. That object will be 48493 times bigger and stretched to all kinds of crazy. So yeah, I think reasonable warping is fair game. Focus stacking and bracketed exposure techniques to overcome the limitations of equipment also fall in here.

Cat 2- Things that could have happened. Embellishments. Enhancements.

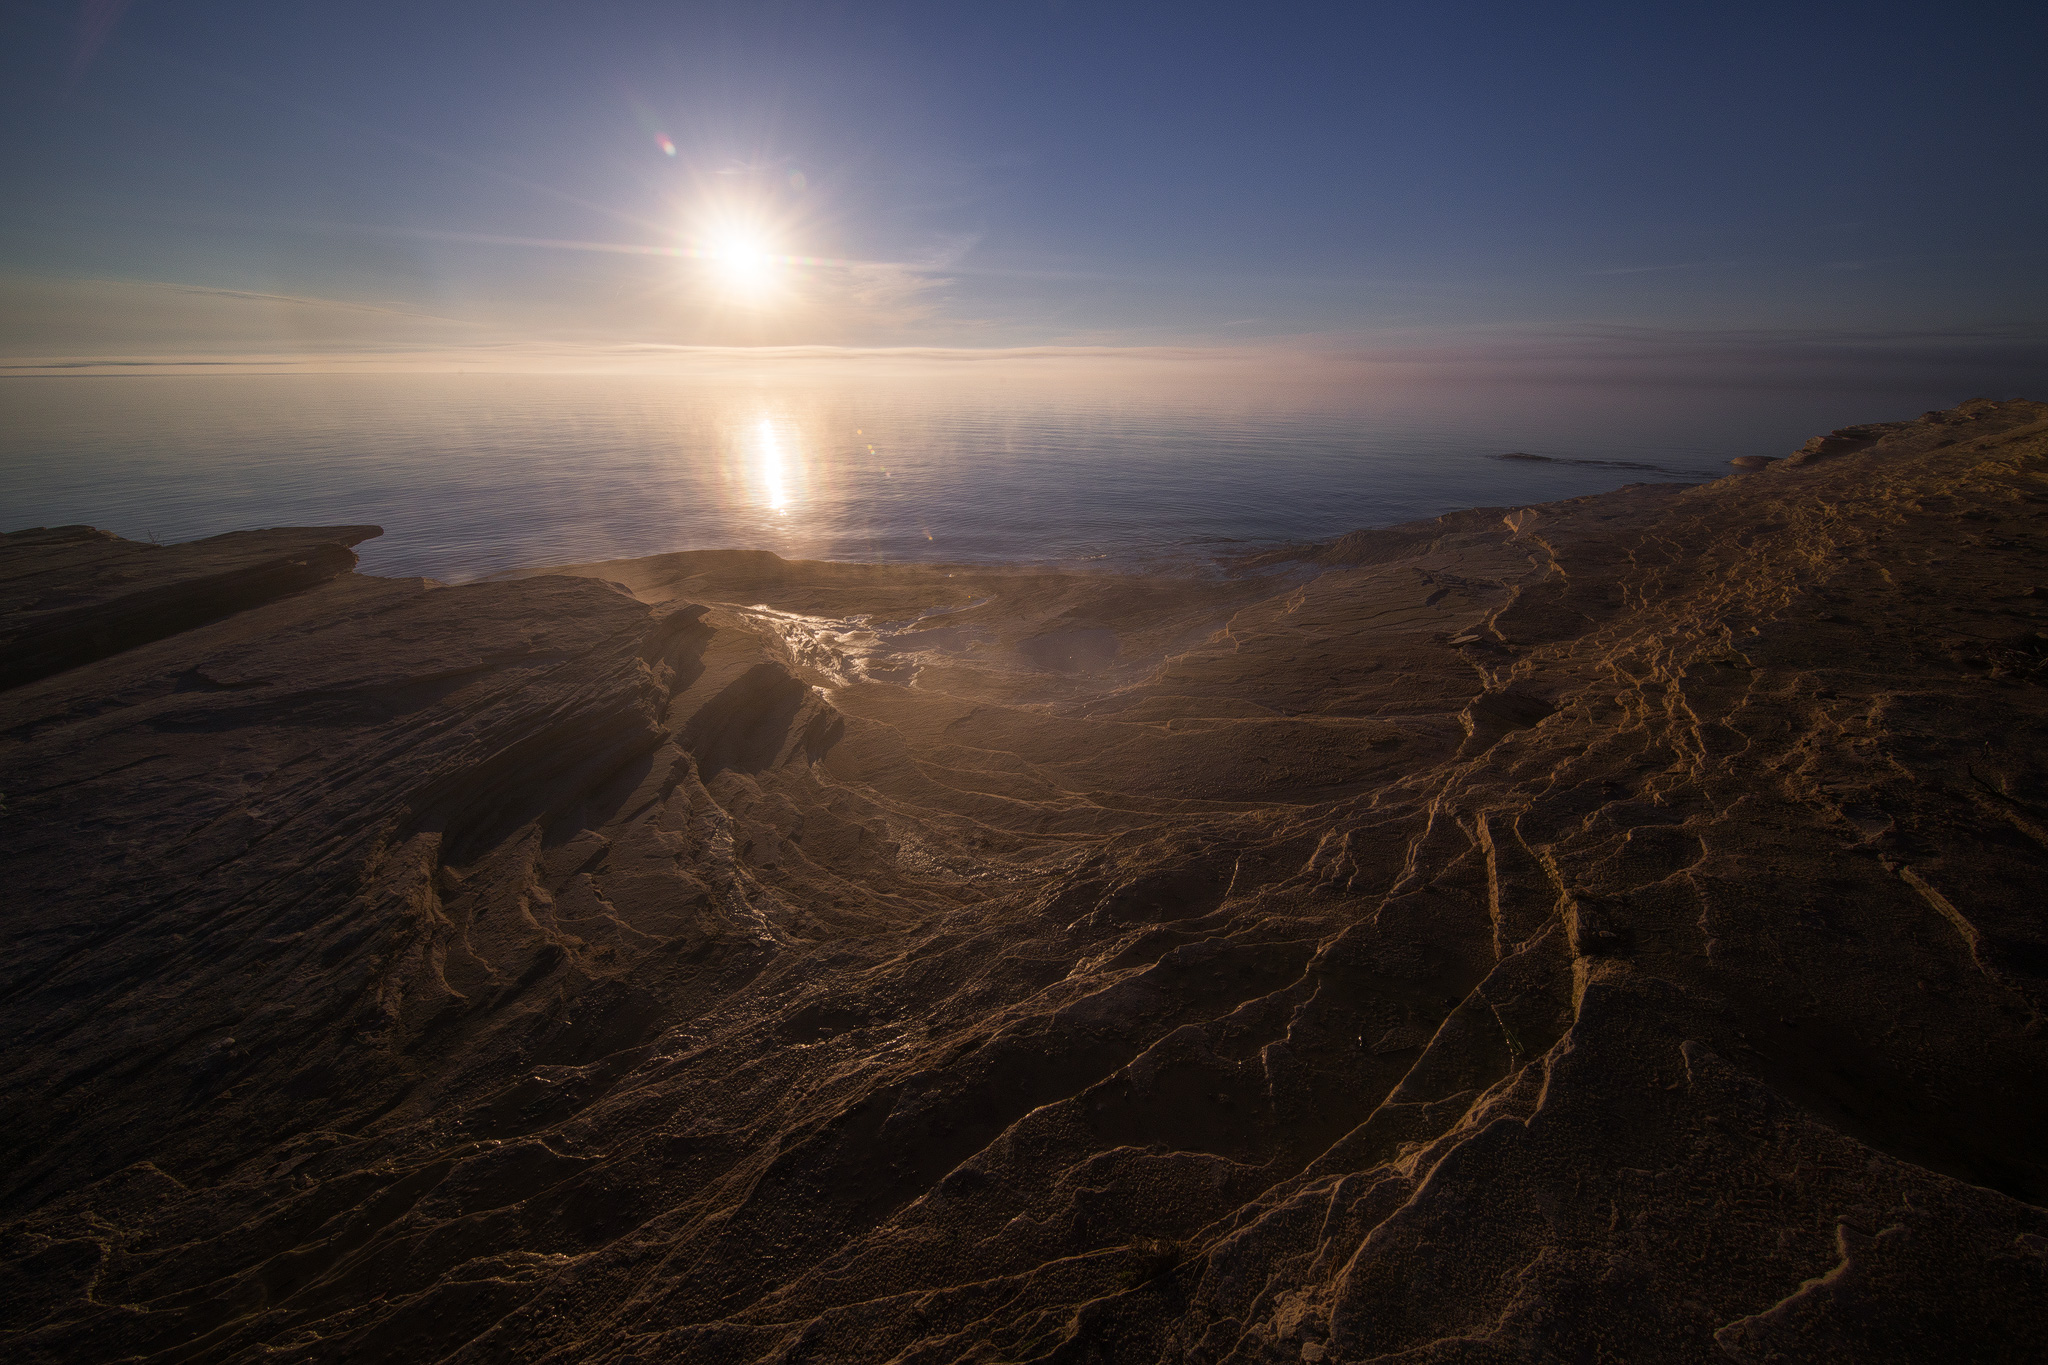
Suppose I have a nice waterfall image, but it would look a bit better with some bluer water? Or, a night image with a pesky plane that I remove? Maybe change the white balance significantly one way or another to give a summer or winter feel? What about those night shots where the foreground is lit by late twilight but the stars are from 30 minutes later? That actually happened, just not at the exact same time. Those stars did twinkle over that very same landscape! Light painting, orton effect, dodging and burning, this is the category for that stuff- things that are enhancements to what was actually there. They are not entirely the truth, but are more real than fake. This is a very important area, because this realm is where true creativity in post-processing can, and has been, elevating the art to new levels over the last 10 years or so. It’s also dangerous ground for me, as I can easily slip over into…..

Cat 3- Things that could not happen.

Blatant fakery. Sky filling moons on wide angle shots. Stars in front of clouds. Things that could never be, no matter what conditions transpired, no matter what lens you used, no matter where you stood. Impossible places that could not exist without photoshop.

If you hadn’t already guessed, my goal is Cat 1 and 2 style images. I will throw in examples of all three below.

"Boneyard" Cat 1. This is the best representation of this scene I could muster. 

"Boneyard" Cat 1. This is the best representation of this scene I could muster. 

"Deserted" Cat 2. There was color in the sky, but not this much color. There was a glow in the air, but not this much glow. I also used averaging of many exposures to emulate a longer exposure, but I would consider that a Cat 1 technique, as the clo…

"Deserted" Cat 2. There was color in the sky, but not this much color. There was a glow in the air, but not this much glow. I also used averaging of many exposures to emulate a longer exposure, but I would consider that a Cat 1 technique, as the clouds really were moving as depicted- I just didn't have an ND filter at the time. 

"Untitled" Cat 3. The atmosphere and light are all fictional. To top it off, the sun doesn't rise from this area. Would anyone notice? Who can say, but I know, and thus I won't be putting it on the website. (Although I did have fun seeing what …

"Untitled" Cat 3. The atmosphere and light are all fictional. To top it off, the sun doesn't rise from this area. Would anyone notice? Who can say, but I know, and thus I won't be putting it on the website. (Although I did have fun seeing what I could get away with!)

Here is the RAW for the above. 

Here is the RAW for the above. 

I hope that clears up any questions you may have about what you are seeing when you view my work. As always, feel free to contact me if you have any further questions. And please, do not take this as a critique of YOUR work, it is most definitely not. I will say that we are certainly living in exciting times for the art!

To conclude all of this- imagine in a few years, remote controlled DSLRs with a pan/tilt/zoom function start appearing in locations like Tunnel View in Yosemite, and are rented out hourly via the web. It would certainly reduce impact to heavily traveled places, but will the art be different when people start creating images from places they have never seen with their own eyes? It’s only a matter of time. And don’t even get me started on AI- Google is teaching neural networks to create landscape imagery from Google Earth photos. How do you feel about art that is created without human intervention at all?

Interesting times indeed!


-Z

Relevance

Cottonwoods-copy.jpg

I've heard other photographers speaking about "staying relevant" and it has always made me scratch my head. Relevant to whom, exactly? This art, this adventure we have chosen, it is not defined by likes, faves, commentary or recognition- never has been, never will be. It's a long game.

Serpent-copy.jpg

One day, you and I will both stop creating images, whether we want to or not. Time will see to that. And when you do, what do you want your art to have become? What will be the point of it? Personally, I hope inspiration to others. Not inspiration to photograph, mind you, or even to venture to certain parts of the world- but inspiration to appreciate life itself. Sunlight filtering through foggy trees, quiet times spent by soothing waters, starry nights above... So many sacred, miraculous moments that you will be lucky enough to savor for your brief spin on this watery rock, if only you remember to do so. 

Solstice-copy.jpg

Creation itself is an act that needs to have no final destination in mind. (Indeed, it is often more productive if unguided.) What is the point, exactly, of sticking your toes in warm sand, or stealing a kiss? It feels good, and that is enough. Let it be enough for your creativity as well. An artist is a person who is in love with the world, and art is the expression of that love.

How could love ever cease to be relevant? 

-Z

Weightless-copy.jpg

Web Sharpening

See the most current update...

Hey Guys and Gals, I have been busily nerding out on a new web sharpening action for landscape imagery. (Not to say you couldn't use it on cat pictures, just that it is untested- and there is a small chance it would rip a hole in the spacetime continuum....)

What do you need to use this action? A semi-modern version of photoshop and a reckless sense of adventure should do. 

So what is it, and why is it better than what you are using now? 

First off, I didn't say it was better! It's just different. It is free, and the more tools in your toolbox- always a good thing, right? Long story short, I am very into editing, but not the repetitive, boring stuff like dust spot removal. With all the sharpeners i found online, getting rid of pesky halos around ridge lines, tree branches, etc is both necessary and very dull work. I wanted a "fire and forget" type sharpener, that could handle whatever I threw at it and still come back with natural results. 

Comparison of different modes at 100%. On the right, notice the prominent halos around every ridge. Next block to the left, halos are almost eliminated, but the image is still very sharp. Left of that, the haloing is gone, and the image is much shar…

Comparison of different modes at 100%. On the right, notice the prominent halos around every ridge. Next block to the left, halos are almost eliminated, but the image is still very sharp. Left of that, the haloing is gone, and the image is much sharper than the unsharpened image. Here is the image file if you want to view 100% on your own device, the web resizes these things sometimes. 

Above is the halo mask that was generated. You can see it identified the ridge lines quite well. It works in concert with the luminosity mask and the spectrals mask. 

Above is the halo mask that was generated. You can see it identified the ridge lines quite well. It works in concert with the luminosity mask and the spectrals mask. 


In a very general overview, this action sharpens your image, and then hunts down and zaps any areas where haloing or over sharpening occur. If you thirst for more technical details, keep reading- if that's enough for you skip to the next section. Specifically, first it sharpens your image based on the popular method that I believe was invented by Alex Nail, and is also used in the popular TK actions. It involves resizing your image in different steps and sharpening at each point. It also resizes a completely unsharpened version of your source. Next, it runs analysis to determine areas with strong micro contrast. Then, it generates a mask to reduce or eliminate the sharpening in those areas. It outputs the result of the masked sharpened layer combined with the unsharp layer, then it runs the whole analysis/output process two more times to make sure all those pesky halos are zapped. The final, 3x analyzed mask is applied to the fully sharp layer. Next, the image is analyzed again on a broad scale to determine areas of overall lightness and darkness, and a sharpened layer free from the halo masking effect is allowed to bleed into the original image at 50%, to allow spectral highlights to appear in the darker areas of the image. (think water glinting on dark rocks in the foreground, stuff like that) Finally, a shadows luminosity mask is created, and applied to both of the previous layers, which are now in a group. Phew! 

It has 3 output resolutions- 1080 (instagram), 2048 (Facebook) and finally Retina, for high DPI displays. If you like it and you find it lacking in a certain resolution, message me and I'll see if I can add it for you. It also has 4 flavors- Strong, Mid, Light, and Natural. Natural uses full strength luminosity masking and no spectral highlights added for the most halo-free viewing experience. Strong has NO luminosity masking and full strength spectrals, for the most apparent sharpness. The other two fall in-between the Strong and Natural settings. Enjoy, and feel free to let me know what you think! 

Thanks, 

Zach 

UPDATE 02-25-18

Sharpening actions updated to 2.4, thanks to Kane Engelbert for the great suggestions! If you haven't done so, do yourself a favor and check out Kane's work. 

- Simplified the options, now there is only Strong and Natural presets. Strong uses halo masking, natural uses halo masking plus 50% lumo masking to keep the sharpening out of the highlights. The default is a bit strong, the intent is for the user to adjust opacity to taste. 

- Many new size options including 900, 1000, 1200, 1400, 1600, 1800, 2000, and one for the new instagram vertical size 1080w x 1350h

- Spectrals layer works well on traditional landscapes but results erratic on abstracts and such, therefore the default is now off and can be turned on at users discretion to add unmasked sharpening into darker areas. 

- Should be a bit faster on large files IE d850, etc

- Default strength now 50% for Natural, 100% for Strong

Enjoy! 

A few field notes on DOF stacking, and a free calculator thingy. Yay!

Perhaps you're familiar with a technique called focus stacking, or Depth of Field (DOF) blending- a multiple exposure technique where a series of images are taken with different focal points. This is done to create a final image with more in focus than a single shot would allow. The first use of this technique was in the sciences, for documentary shots of very small objects such as insects or microscopy. It has since become popular with macro art photographers, and as of late it's been popping up in landscape photography. 

With macro subjects of flowers and insects, depth of field is incredibly thin- even with small apertures. The benefits of focus stacking are pretty obvious for this sort of photography. Yet, with a wide angle lens, DOF is already quite large. So why would you want to use a complicated technique, when you can just back up a little and get everything sharp? The main reason is compositional flexibility. Sometimes in a technical art such as photography, your equipment can limit your creativity. DOF stacking can allow you more freedom. If you use a wide lens, you already know that position is absolutely critical to composition. Using DOF stacking and a 14-24 mm, I can get within inches of a mossy rock, stream, or icy pool, turning tiny details into leading lines or eye catching, interesting shapes.  If I get close enough, the entire bottom third of a vertical shot will be a patch of ground about the size of a magazine, with the background still able to include a good size mountain range! This allows an enormous amount of compositional variation. If you haven't tried it, give it a whirl. What's the worst that could happen? :) 

The basic method I use is as follows- first, I find my composition with a combination of either looking through viewfinder/live view or test shots. Next, I set up my tripod to accommodate the comp. (Don't be tempted to do the reverse- setting up a tripod and then looking for comps will make you miss a lot of great options with a wide lens!) By the time I find what I'm looking for, my tripod is often fully collapsed and my lens is quite close to the ground. Even a movement of a few inches completely changes the composition. I look for strong leading lines, repeating patterns, and subjects that will complement my background subject. Once I'm happy with everything, I take the series of shots. (Manual focus) The first shot is always focused to infinity. Next, I focus a bit closer, while leaving enough overlap of sharp areas to allow easy blending. I repeat this until every part of the composition is in focus for at least one exposure. I find that I can cover the entire possible focal range of the 14-24 2.8 Nikkor lens (at 14mm/f16) using 5 shots. Some pros use only 3 shots, but I'm not quite that confident in my manual focusing yet! :) Note that many lenses zoom out a bit as they focus closer, so allow a little wiggle room in your composition for cropping later. And finally, be aware that a flat subject such as rock or ice will lend itself to much easier blending than a bunch of flowers blowing in the wind- for reasons of both motion, and the added complexity of blending subjects that are separated from the background by a large distance. 

Once the images are in the computer, I make any RAW adjustments to all files simultaneously. I then stack all the images on top of each other in Photoshop. I use either auto or manual alignment to line everything up. The final step is hand blending with masks. (Personally, I haven't had much luck with the auto blend in Photoshop, or any other automated focus stacking software.) Manually blending the images can be quite easy and quick, or incredibly painful and slow- it mostly depends on your subject matter and proficiency with masks. A hard edged brush with 100% opacity is a good start. Take your time and check everything twice, it's easy to miss spots. 

DOF blend to capture reflection in a very small pool of water. Nelsons Ledges, Ohio. 

DOF blend to capture reflection in a very small pool of water. Nelsons Ledges, Ohio. 

When I started using DOF blending in my own photography, there was a lot of hit-or-miss experimentation. Every DOF stacking calculator was  for macro stuff and rather useless for wide angles. Having a bit of free time one day, I made an Excel calc that allowed me to put in desired aperture/focal length, and get a suggested set of images to take. Keep in mind that wide angle DOF stacking does not require the use of this, or any other calculator. Getting out there and learning how your particular lens  works in various situations is the best method for mastery. Still, if you'd like a general set of guidelines to use starting out, want to test out specialized nighttime configurations, or just want to see what 5 shots at 600mm/f11 will getcha- I hope you find it helpful.


DOF Calc V1


Some useful links- 


Alex Noriega

Master of DOF blending and dark overlord of editing in general, offers advanced online workshops that are in depth and incredibly helpful. Also kind of sassy, which I appreciate. 


Ryan Dyar

Another guy with painfully good photo skills, has a series of editing videos that cover DOF blending and a ton of other stuff.


Marc Adamus

As stated above, there is no substitute for learning in the field. Marc doesn't have any online vids, tutorials, blogs, or facebooks- but the tours he offers are unlike any others. I went and it was definitely one of the best things I have done for my photography. 


And final disclaimer- nope, none of these guys gave me any money. I recommend them because I've personally benefitted from their knowledge, that is all. :) 


The space between the ice on the left and right of the foreground is about 10 inches. The waterfall in the upper frame is at least 70 ft tall!

Unedited overview of the area from the first shot. This is from "standard" tripod height IE eye level. The foreground from this height didn't do much for me, but getting close allowed 3 or 4 interesting perspectives to choose from.